树莓派实战GPRS
(→简单AT命令) |
|||
| 第50行: | 第50行: | ||
==简单AT命令== | ==简单AT命令== | ||
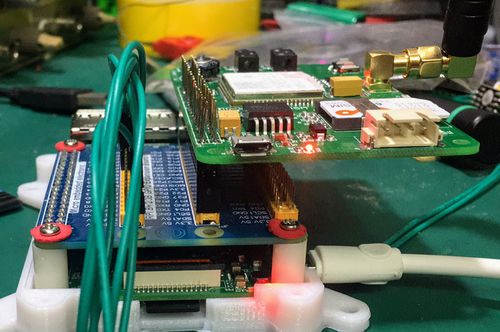
| + | [[文件:RaspBerry_Sim800.JPG|right|500px]] | ||
=== 查询SIM卡状态=== | === 查询SIM卡状态=== | ||
| − | + | at+cpin? | |
| − | + | ||
===查询网络状态=== | ===查询网络状态=== | ||
| − | + | At+cops? | |
| − | + | +cops 0,0,“Chian mobile” | |
===读取国际识别码=== | ===读取国际识别码=== | ||
| − | + | AT+CIMI | |
===发送短消息=== | ===发送短消息=== | ||
| − | + | > AT+CMGF=1 | |
| − | + | OK | |
| − | + | > AT+CMGS="+861533xxxx3" | |
| − | + | > test sms | |
| − | + | > ctl+z | |
| − | + | +CMGS: 0 | |
=== TCP 连接=== | === TCP 连接=== | ||
| − | + | ||
at+cipstart="tcp","api.thingspeak.com","443" | at+cipstart="tcp","api.thingspeak.com","443" | ||
| 第86行: | 第86行: | ||
at-cipshut | at-cipshut | ||
| − | |||
[https://github.com/carrascoacd/ArduinoSIM800L sim800 Arduino HTTP] | [https://github.com/carrascoacd/ArduinoSIM800L sim800 Arduino HTTP] | ||
| 第92行: | 第91行: | ||
[https://www.rhydolabz.com/wiki/?p=16325 PPP Via Sim800 modem] | [https://www.rhydolabz.com/wiki/?p=16325 PPP Via Sim800 modem] | ||
| − | |||
==串口拨号== | ==串口拨号== | ||
2017年10月26日 (四) 11:10的最后版本
目录 |
[编辑] 1 SIM800 GPRS/GSM
老牌GPRS芯片, 所以兼容性好. Arduino上都有很好的支持(各种github的库很多), 更不用说数梅派这种Linux操作系统的.
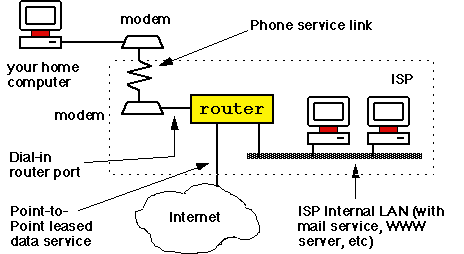
Arduino使用SIM800一般都是用AT命令, 利用SIM800内置的tcp/ip协议栈通讯. 而具有完整协议栈的数梅派则可以直接当SIM800是一个Modem, 利用AT命令拨号到运营商APN, 就是早期电脑通过电话线连接一个Modem盒子的模式.
这里介绍的是SIM800用在数梅派上的常见问题和解决方法. 包括了串口设置, 拨号设置, 拨号程序置入系统systemd服务的设置方式.
[编辑] 2 树梅派串口环回
数梅派上使用SIM800的主要问题是串口经常被占用. 而且系统很复杂, 多种渠道会占用唯一的硬件串口资源. 一旦串口能正常工作, 在数梅派上使用SIM800是一件很轻松的事情.
所以串口环回试验一定要做。就是
   将RX/TX 拿杜邦线短接,启动
   minicom -D /dev/ttyS0  (或者 /dev/ttyAMA0)
   这样就能看到键盘敲入的字符都有回显。如果minicom开启了本地回显(CTRL+A E), 每一个敲入的字符都显示为两个。
如果不能得到正确的回显或者各种运行错误, 请按照下面步骤排查。
确保kernel不使用串口做为console
 sudo raspi-config
  禁用
 "Advanced" choose "Serial" (Enable/Disable shell and kernel messages on the serial connection)
确保 /boot/cmdline.txt 不包含串口选项
 类似这样:
 dwc_otg.lpm_enable=0 console=tty1 root=/dev/mmcblk0p2 rootfstype=ext4 elevator=deadline rootwait
 不能是这样的(树莓派版本不同,下面的AMA0 有可能是 ttyS0)
  dwc_otg.lpm_enable=0 console=ttyAMA0,115200 kgdboc=ttyAMA0,115200 console=tty1 root=/dev/mmcblk0p2 rootfstype=ext4 elevator=deadline rootwait
禁用 serial-getty 服务
  sudo systemctl disable serial-getty@ttyAMA0.service
  sudo systemctl mask serial-getty@ttyAMA0.service
确保e UART pins (15 and 16 wPi) are in state ALT0
 gpio readall
 应该是如下:
 Phy 8   ALT0  NAME TXD
  如果不是,可以用如下命令修改
  gpio mode 15 ALT0; gpio mode 16 ALT0
确保 uart 在 /boot/config.txt使能,特别是如上步骤操作后 /dev/ttyAMA0 (ttyS0) 消失的情况
确保 enable_uart=1 在 /boot/config.txt 内
[编辑] 3 简单AT命令
[编辑] 3.1 查询SIM卡状态
at+cpin?
[编辑] 3.2 查询网络状态
At+cops?
+cops 0,0,“Chian mobile”
[编辑] 3.3 读取国际识别码
AT+CIMI
[编辑] 3.4 发送短消息
> AT+CMGF=1 OK > AT+CMGS="+861533xxxx3" > test sms > ctl+z +CMGS: 0
[编辑] 3.5 TCP 连接
at+cipstart="tcp","api.thingspeak.com","443"
AT+cipDI=0
at+cipsend
> POST /update?api_key=5J9GD27HXIMASDRC&field1=5000&headers=false HTTP/1.1
>GET /update?api_key=
at-cipshut
[编辑] 4 串口拨号
sudo apt-get install ppp screen elinks

ls /etc/ppp/peers/

sudo vim /etc/ppp/peers/gprs
要保持115200的波特率, 9600的话速度非常低。
[编辑] 5 默认路由
ppp 已经设置了默认路由.
route add default ppp0
[编辑] 6 使用systemd服务自动拨号
Linux下又很多种方式自动拨号. 比较常见的是设置系统的interfaces, 自动拨号. 另外也可采用systemd管理的系统服务来实现启动自动拨号.
systemd需要写一个简单的服务配置文件放在/etc/systemd/system下, 然后使能并启动服务, 过程如下
#构建服务描述
cat /etc/systemd/system/simp800-ppp.service

[Unit]
Description=SIM800 PPP Service

[Service]
ExecStart=/usr/bin/pon gprs
StandardOutput=null
Restart=always
#WorkingDirectory=/home/pi/  # we don't need working at a specific directory

[Install]
WantedBy=multi-user.target
Alias=sim800-ppp.service


#使能并启动服务
systemctl enable sim800-ppp
systemctl start sim800-ppp


</source


另外start-stop-daemon/setsid 皆可可以用于临时测试启动一个daemon程序, 例如:

<source lang="bash">
#Start daemon
sudo start-stop-daemon --start -b --pidfile /run/ppp --startas /usr/bin/pon gprs

#More easy and dirty way
sudo setsid /usr/bin/pon gprs > /dev/null 2>&1 < /dev/null &

