Android/CyanogenMod 发烧笔记
目录 |
1 缘起
手上的三星 Android 机 T959 用了快三年了,一直用原生系统,挺好用,一直没有分析的动力。
最近刷了 MIUI V5,内置了一堆的吸流量、浪费系统资源的应用,苦不堪言,该好好来解析一下手机 Android 系统了
2 探索你的手机系统
正常的系统里,您用“文件管理器”是看不到你整天用的手机系统的是个啥样的(类似看不到window 下的 C:\windows 文件夹的内容)。
要想看到、甚至精简你的系统,有两种主要方法:
1. ROOT 获取系统管理员权限,然后使用 Root Explorer 这个APP去访问根目录、去 /system/app 下去删除你在正常系统里删不了流氓APP,比如 “米币”,“系统更新” 等等
2. 使用调试工具 ADB,ADB 是Android官方提供给开发者的一种调试工具,很容易使用,可以随心所欲地控制、修改你的手机系统。Android 的好处就是,人人都能通过简单的学习,自由地修改你的系统。武装好自己的大脑,任他什么互联网流氓应用都控制不了你。
2.1 ROOT
2.2 ADB
ADB 本是Android SDK(APP 开发环境)内置的调试工具,可以通过 USB/WiFi 连接手机,获取ROOT权限,执行 shell 命令,上传下载数据等。ADB 功能强大,是骨灰级发烧友杀人越货之必备良器
Google 有独立的包,1MB 左右,根据你的平台选用相应的包即可。
http://dl.google.com/android/repository/platform-tools_r19-linux.zip
http://dl.google.com/android/repository/platform-tools_r19-windows.zip
http://dl.google.com/android/repository/platform-tools_r19-macosx.zip
比如 WINDOWS 下,解压 zip 包后,把 adb.exe AdbWinApi.dll AdbWinUsbApi.dll 拷贝到 C:\WINDOWS 下 (省得改环境变量)
然后打开“运行”,输入cmd,回车,开启一个命令行窗口,输入 adb devices,如果你安装了手机的 USB 驱动,在手机里 “设置” --> “开发者选项” --> “USB调试模式” 打开的话,你就能看到
adb devices
List of devices attached
32334071DA1D00EC	device
表明 adb 已经发现手机设备了
运行 adb shell 则会获得一个 shell,你就可以像在 Linux 中一样了
adb shell

root@android:/ # id
uid=0(root) gid=0(root)

root@android:/ # cat /proc/version
Linux version 3.0.52-Semaphore_JB_2.6.1sv (stratosk@semaphore.gr) (gcc version 4.7.3 20121001 (prerelease)
(crosstool-NG linaro-1.13.1-4.7-2012.10-20121022 - Linaro GCC 2012.10) ) #313 PREEMPT Sun Nov 25 20:47:09 EET 2012

root@android:/ # cat /proc/cpuinfo
Processor	: ARMv7 Processor rev 2 (v7l)
BogoMIPS	: 99.26
Features	: swp half thumb fastmult vfp edsp thumbee neon vfpv3
CPU implementer	: 0x41
CPU architecture: 7
CPU variant	: 0x2
CPU part	: 0xc08
CPU revision	: 2

Hardware	: aries
Revision	: 0030
Serial		: 32334071da1d00ec

root@android:/ # free -m
             total         used         free       shared      buffers
Mem:        401084       395532         5552            0         1648
-/+ buffers:             393884         7200
Swap:            0            0            0
更多信息输出,可参考 MIUI V5 在老机三星 T959 上的第一眼
备份手机的装机应用到 t959-system-app/ 目录下:
$ adb pull /system/app t959-system-app/
pull: building file list...
pull: /system/app/YellowPage.apk -> t959-system-app/YellowPage.apk
pull: /system/app/WeatherProvider.apk -> t959-system-app/WeatherProvider.apk
pull: /system/app/Weather.apk -> t959-system-app/Weather.apk
......
......
对于系统的装机应用,adb uninstall 是移除不了的,得直接进 shell,手动删除之:
$ adb uninstall /system/app/LiveWallpapers.apk
Failure

$ adb shell
root@android:/ # cd /system/app/
root@android:/system/app # rm LiveWallpapers.apk
root@android:/system/app # ls LiveWallpapers.apk
LiveWallpapers.apk: No such file or directory
还有其他强大的命令:
adb shell am          # 强大的 Activity Manager
adb shell dumpstate
adb shell dumpsys
adb shell ime list

adb reboot recovery   # 进入恢复模式
3 fastboot
$ adb reboot-bootloader
$ fastboot devices

$ fastboot oem unlock          # 解锁 bootloader
3.1 清理顽固流氓
ROM 中不能从正常途径卸载的装机应用(如米币,小米商城等),一般都可以ROOT后,用 RootExplorer 直接从 /system/app/ 中删除即可
但有些顽固的流氓应用隐藏很深,比如 MIUI V5 自带的病毒扫描(腾讯提供),你根本找不到他的APK包在哪,运行他实时用 adb shell ps 查看,你会发现:系统并没有新的可疑进程
3.1.1 MIUI V5的病毒扫描去除
连上USB线到PC,手机系统“设置”里打开 “USB调试”, 打开病毒扫描应用,只有在其扫描的过程中,你用 top 才能发现 com.android.settings 这个关键系统应用的CPU占有率太异常了:
$ adb shell top -n 1 -d 1 -m 10 -t

User 27%, System 13%, IOW 0%, IRQ 0%
User 29 + Nice 0 + Sys 14 + Idle 64 + IOW 0 + IRQ 0 + SIRQ 0 = 107

  PID   TID PR CPU% S     VSS     RSS PCY UID      Thread          Proc
 3020  3020  0  21% S 334328K  75816K  fg system   ndroid.settings com.android.settings
 6120  6120  0   7% R   1240K    600K     root     top             top
  185   332  0   3% S  44376K  23560K  fg system   SurfaceFlinger  /system/bin/surfaceflinger
 6109  6109  0   1% S      0K      0K     root     kworker/u:2
 6114  6114  0   1% S      0K      0K     root     kworker/u:3
  185   185  0   1% S  44376K  23560K  fg system   surfaceflinger  /system/bin/surfaceflinger
  185   765  0   0% S  44376K  23560K  fg system   Binder_3        /system/bin/surfaceflinger
 4293  4293  0   0% S      0K      0K     root     kworker/0:0
  185   360  0   0% S  44376K  23560K  fg system   Binder_1        /system/bin/surfaceflinger
  185   358  0   0% S  44376K  23560K  fg system   EventThread     /system/bin/surfaceflinger
在不开病毒扫描时,大部分情形下com.android.settings 的CPU占有为0%
因此,这个病毒扫描应该隐藏在 com.android.settings 这个关键系统应用中:
$ adb shell dumpstate | grep -i virusscan
      Service com.android.settings.VirusScanService:
      Service com.android.settings.VirusScanService:
        4: [2013-12-13 19:26:08.228] executeForLastInsertedRowId took 1ms - succeeded, sql="INSERT INTO applications ('_id',
       'name', 'description', 'package', 'class', 'icon', 'launch_count', 'last_resume_time') VALUES (?, ?, ?, ?, ?, ?,
       COALESCE(?, 0), COALESCE(?, 0));", bindArgs=[null, "病毒扫描", "应用", "com.android.settings",
       "com.android.settings.VirusScanActivity", "android.resource://com.android.settings/drawable/virus_scan_icon", 27,1386933816654]
        41246fb8 com.android.settings/.VirusScanActivity filter 41247298
        41247698 com.android.settings/.VirusScanService filter 41247898
        41247698 com.android.settings/.VirusScanService filter 41247898
      com.android.settings.VirusScanAppActivity
    com.android.settings.VirusScanActivity: 1 starts, 500-750ms=1
    com.android.settings.VirusScanActivity: 22 starts, 500-750ms=10, 750-1000ms=4
    com.android.settings.VirusScanAppActivity: 14 starts, 0-250ms=6, 250-500ms=5, 500-750ms=1, 750-1000ms=1, >=5000ms=1
原来确实丫是隐藏在核心应用 com.android.settings(设置)中的,真TM够毒的!
其是 com.android.settings 的一个 Activity,完整的 INTENT 为: "com.android.settings/.VirusScanAppActivity"
下面来探究探究:
# 启动病毒扫描
$ adb shell am start -n "com.android.settings/.VirusScanAppActivity"
Starting: Intent { cmp=com.android.settings/.VirusScanAppActivity }

# 启动对应的 Service
$ adb shell am startservice -n "com.android.settings/.VirusScanService"
Starting service: Intent { cmp=com.android.settings/.VirusScanService }

$ adb shell am kill-all com.android.settings

# 此两条命令执行后,病毒扫描图标就从桌面消失了
$ adb shell pm disable -n "com.android.settings/.VirusScanActivity"
Component {com.android.settings/com.android.settings.VirusScanActivity} new state: disabled
$ adb shell pm disable -n "com.android.settings/.VirusScanAppActivity"
Component {com.android.settings/com.android.settings.VirusScanAppActivity} new state: disabled

#再想启动的话就会:
$ adb shell am start -n "com.android.settings/.VirusScanAppActivity"
Starting: Intent { cmp=com.android.settings/.VirusScanAppActivity }
Error type 3
Error: Activity class {com.android.settings/com.android.settings.VirusScanAppActivity} does not exist.
更多 adb am 用法参考:http://developer.android.com/tools/help/adb.html#am
3.1.2 MIUI V5文件管理中的快盘
另外一个隐藏较深的是“快盘”,这也是一个怎么也找不到其 APK 文件的主,但点其图标运行后,会进入 “文件管理器“ 的一个界面,应该也是其一个 Activity
4 Android 系统结构
Android 实际 Linux 内核 + Java虚拟机(google自己实现的虚拟机Dalvik)+ 类Java应用(图形环境,手机桌面,应用程序等等)的混合体
手机硬件之上跑的是 Linux 内核(http://www.kernel.org/ ),掌控所有软硬件资源,类似触摸屏、GPS、摄像头、传感器等硬件外设的驱动都实现为 Linux Kernel 的一个模块
上层应用如要访问硬件外设,已不是传统的 GNU/Linux 访问设备方式(比如通过打开 /dev/radio 设备文件,调用 read/write/ioctl 函数与设备交互),Android 把对设备的访问都封装成了一个个的共享库(位于 /system/lib/hw/ 下),比如 camera.aries.so 封装有手机相机的操作,sensors.aries.so 封装有所有传感器访问的操作等,上层应用通过 libhardware.so 这个统一的入口(提供 id 参数,区分具体设备),调用具体设备的封装共享库
http://www.tbray.org/ongoing/When/201x/2010/11/14/What-Android-Is
5 T959 硬件结构
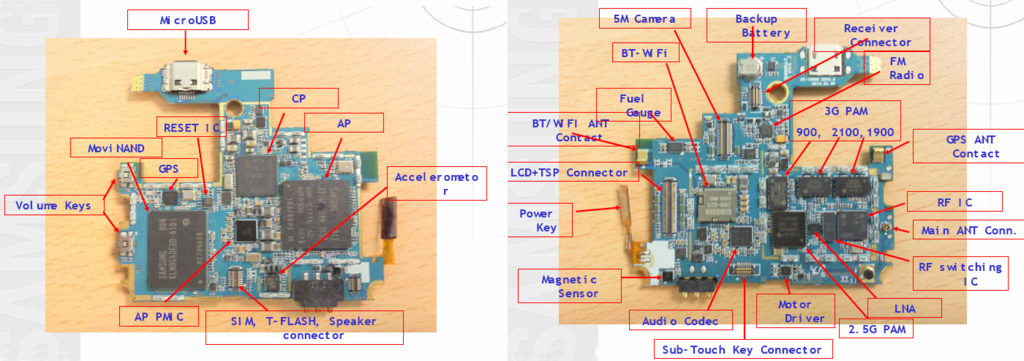
5.1 主板图
5.2 主要芯片
AP: SANSUNG Exynos S5PC111 (S5PC110) -- ARM Cortex A8 1GHz + PowerVR SGX540 显示核心 --- Android 的系统实际是跑在这个处理器上
CP: Infineon 8824 - Infineon X-GOLD 61x Baseband processor --- 处理 2G/3G射频前端送来的数字信号,主要是 2G/3G 的通信协议处理 --- 刷机包中的 modem.bin 是个基带固件(一个实时OS + 协议处理进程),其是跑在这个处理器上的,内部一般就是一个 ARM 核心加一个 DSP 核心
Infineon 5703 --- 2G/3G射频前端 + 模拟基带处理 --- 把天线过来的射频信号降频(down-conversion),模拟信号处理,模数转换后,输出数字信号,同时接受基带处理器的数字信号,处理成射频信号后送给天线发射 (RF Chip)。其与基带处理器之间的数字通信协议为 3G DigRF V3.09,详细可参考:基带处理器和射频前端的通信结构 和 http://www.mipi.org/specifications/digrfsm-specifications
Triquint TQM676021 --- Handset Tritium III PAD (power amplifier/duplexer) module for UMTS band I (IMT2100 band) --- 3G 射频功放,2100MHz 频段 (3G PAM)
Triquint TQM666022 --- Handset Tritium III PAD (power amplifier/duplexer) module for UMTS Band II --- 3G 射频功放,1900MHz 频段 (3G PAM)
Triquint TQM656024 --- Handset Tritium III PAD (power amplifier/duplexer) module for UMTS band IV --- 3G 射频功放,1800MHz 频段 (3G PAM)
2.5G 射频功放 (2.5G PAM)
射频频段切换芯片 (RF Switch chip)
Samsung KB100D00WM - KFG8GH6Q4M 8Gb OneNAND , K4X2G323PB, K4X1G323PB and another 1G package
Samsung KLM8G4DEDD - 8G of MoviNAND
Maxim MAX8998 – Power management IC
Broadcom BCM4751 - single-chip GPS Receiver Solution
Broadcom BCM4329 – 802.11n with Bluetooth 2.1 + EDR and FM receiver
NEC MC-10170 – Elpida Memory + Camera processor
Atmel MXT224 - a 224-node highly configurable touchscreen controller which is part of Atmel's maXTouch product platform
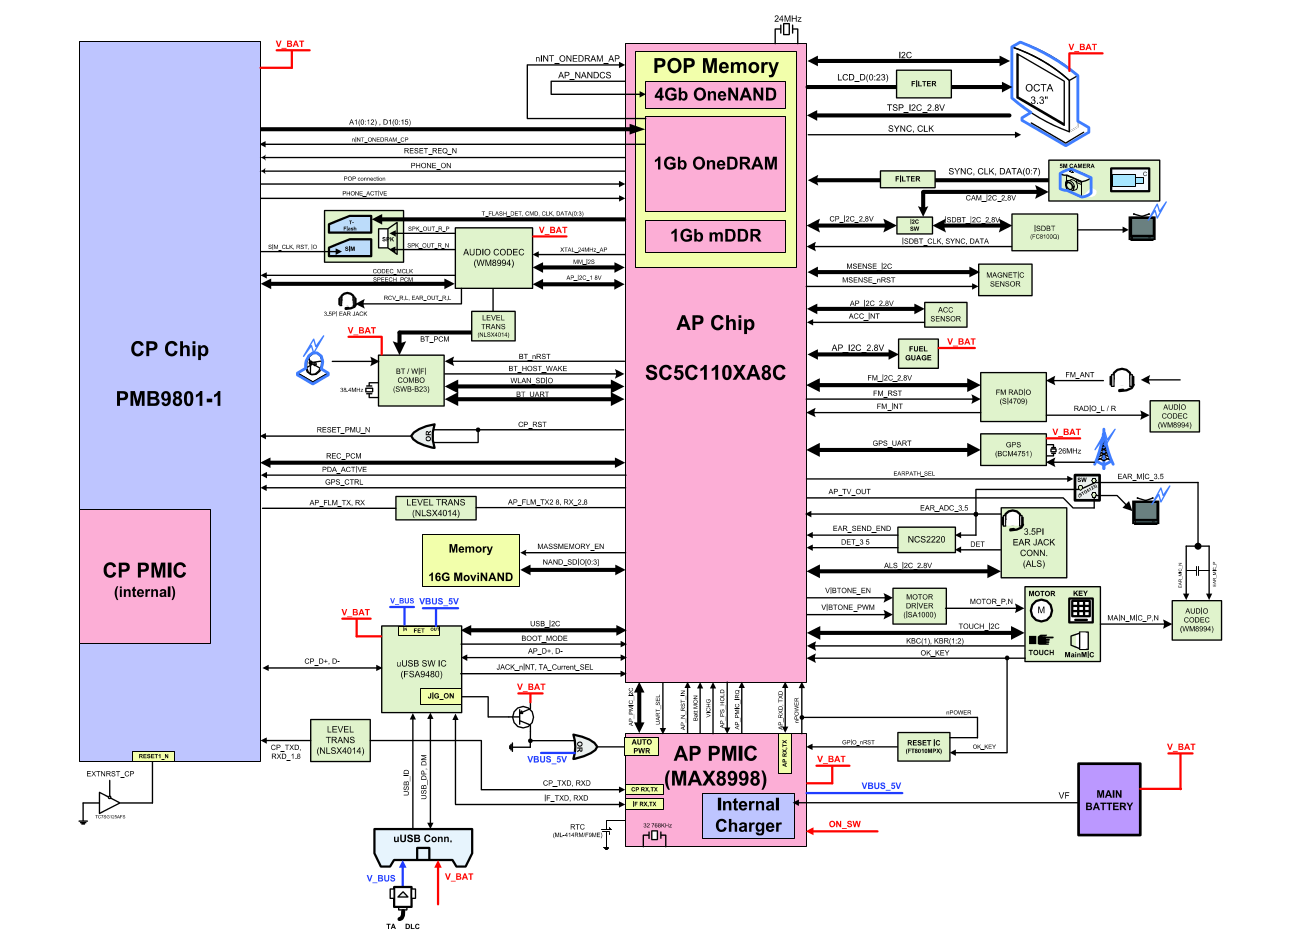
5.3 系统框图
http://www.techinsights.com/teardowns/samsung-galaxy-s-teardown/
http://www.evolife.cn/html/2011/57854.html
http://forum.xda-developers.com/showthread.php?t=1372365
小米3拆解:http://en.miui.com/thread-7633-1-1.html
6 Note II 硬件结构
SANSUNG Galaxy Note 2 (GT-N7102) 硬件结构,即国行联通双卡版。
移步: SANSUNG GT-N7102 Hardware Architecture
7 刷机
7.1 概述
http://wiki.cyanogenmod.org/w/Install_CM_for_vibrantmtd?setlang=zh-cn
https://github.com/search?p=1&q=%40CyanogenMod+++kernel&type=Repositories
7.2 工具
Samsung 官方提供给维修中心的刷机工具 Odin
开源的 heimdall
Odin is an internal Samsung tool used for flashing firmware to their devices (via Download mode, bypassing recovery etc.). Importantly, it also has the ability to repartition the device storage based on a .pit file, which can save you from softbricking (when flashing goes wrong and recovery/the bootloader fail). It is not open source and to my knowledge they have not intentionally released it — a few versions have been leaked. For what it's worth, I have used the version posted here without issue.
Heimdall, however, is open source and duplicates the functionality of Odin. It claims to be more reliable as well, in addition to being cross-platform (Odin is Windows-only).
Both tools appear to work best with Galaxy S devices, so if you're using another device you probably want to ensure someone else has tried it and succeeded. Another note is that they use .tar packages layed out differently than the normal update.zip format used by recovery and OTAs, so you need to get the proper package for it to work.
7.3 heimdall
Then turn off your phone, enter Download mode, connect the USB to phone. Next I used command like this to do the flashing itself
sudo heimdall flash --MDM modem.bin --verbose --no-reboot
Also to you can use to diagnose more with these, in case of issues
heimdall --version
sudo heimdall detect
sudo heimdall download-pit --output I9505.pit --verbose --no-reboot
http://glassechidna.com.au/heimdall/
8 基带
8.1 T959 基带固件
基带固件是刷机包中的 modem.bin 文件,是基带处理器 Intel/Infineon X-GOLD 616 (PMB 8824) 所用文件系统的二进制镜像。X-GOLD616 属于 Intel/Infineon XMM6160 平台。
T959 原生系统的基带版本:T959UVKB1
更新到 MIUI V5 (3.9.27) 后,其自基带版本为 I9000XXJVT。我的是移动神州行 2G 卡,电话短信可用,但 GPRS 不能用
T959 有两片 NAND 存储芯片:集成于 AP 中的 4Gb OneNAND (512MB) 和外围 16GB 的 MoviNAND
在 Android 系统中,OneNAND 的设备文件为: /dev/mtdblock0-6,对应 7 个区:
root@android:/ # cat /proc/mtd
dev:    size   erasesize  name
mtd0: 00780000 00040000 "boot"                   # 7.5MB,bootloader
mtd1: 00780000 00040000 "recovery"               # 7.5MB,恢复出厂设置所需文件
mtd2: 1a600000 00040000 "datadata"               # 422MB, 挂载在 /datadata,用于存放系统APK的数据、配置等
mtd3: 01180000 00040000 "cache"                  # 17.5MB,挂载在 /cache
mtd4: 00c80000 00040000 "efs"                    # 12.5MB,挂载在 /efs,存在手机无线电相关的核心配置数据,注意备份
mtd5: 01000000 00040000 "radio"                  # 16MB,挂载在 /radio,基带处理器所用文件系统的二进制镜像 modem.bin 就放在这个区
mtd6: 00b00000 00040000 "reservoir"              # 貌似是保留区
如果需要修改 modem.bin 的话,找到新版本直接替换 /radio/modem.bin,然后重启即可。
T959 比较稳定的基带版本是 T959UVKB5:http://vdisk.weibo.com/s/dn5OZrwhV3k0 解压后直接用 adb push 替换:
$ adb push modem.bin /radio
重启手机即可
8.2 常用芯片
8.3 Hack
- [XMM6260][X-GOLD 626] Modem Hack-Pack: http://forum.xda-developers.com/showthread.php?t=1483053
- hardware_ril_samsung-ril: https://gitorious.org/replicant/hardware_ril_samsung-ril/source/master:+
- libsamsung-ipc: https://github.com/morphis/libsamsung-ipc
9 Dalvik虚拟机
http://carvencao.blog.sohu.com/154325146.html
10 编译APP
11 开发APP

