WiFi 智能插座
(→准备一片通用模块) |
|||
| 第1行: | 第1行: | ||
| + | == Overview == | ||
| + | |||
| + | |||
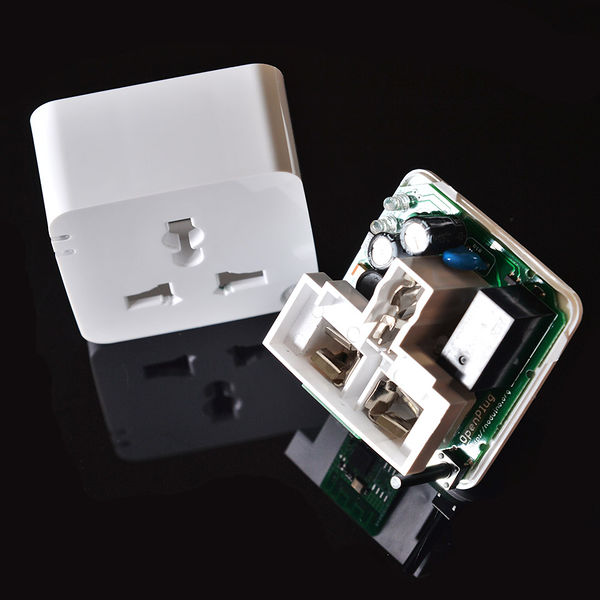
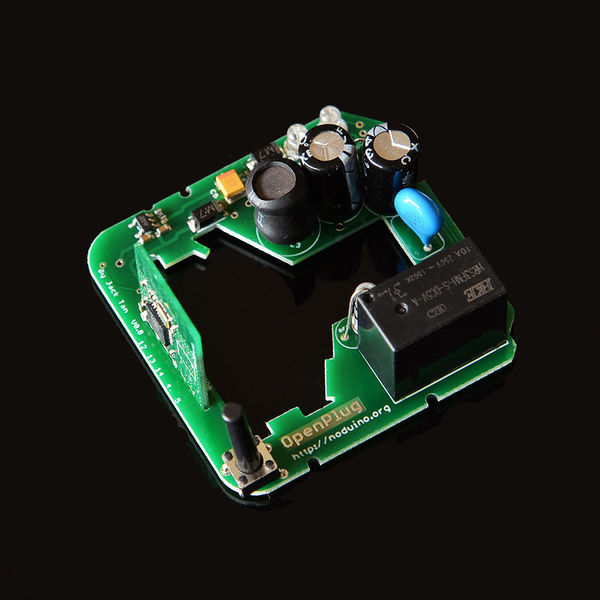
| + | * AC 85V - 250V Smart Plug | ||
| + | * ESP8285 inside | ||
| + | * 250V 10A relay | ||
| + | * Shell size 53mm x 53mm x 27mm | ||
| + | |||
| + | |||
| + | [[文件:Open-plug-board-shell.jpg | 600px]] | ||
| + | |||
| + | |||
| + | [[文件:Open-plug-board.jpg | 600px]] | ||
| + | |||
| + | |||
| + | [[文件:Noduino-works-with-logo.png | 600px]] | ||
| + | |||
| + | <br><br> | ||
| + | |||
== Quick Start == | == Quick Start == | ||
| − | + | [[文件:Maike-wifi-ctrl-2233-all.jpg]] | |
| − | |||
| + | * 插座通电,等 6 s 左右,指示灯 1 秒左右慢闪,表示在等待配网 | ||
| − | + | * 如果不在慢闪,长按按钮 10 秒 | |
| + | * 手机连接 2.4G WiFi ,微信扫描二维码,点 "配置设备上网" | ||
| − | * | + | * 按提示输入 WiFi 密码,点 “连接”,等待配网完成(注意,设备目前只支持 2.4G,不支持 5G WiFi);此外企业级安全认证也暂不支持) |
| − | + | ||
| − | + | ||
| − | + | * WiFi 配置完成后,微信自动进入局域网发现设备模式,其会列出设备列表 | |
| + | |||
| + | * 点击第一个设备,进入页面,在页面最下面会有 “绑定设备” 按钮 (如果已经绑定过改设备,最下面的按钮为“进入公众号”),点击按钮,完成设备绑定 | ||
| + | |||
| + | * 完成后,点“进入公众号”,在公众号菜单的 “智能设备”,即可列出你绑定的所有设备,点一个设备,即可进入设备控制页 | ||
| + | |||
| + | |||
| + | 其他人需要控制设备,需要先连接到同样的路由器,在设备通电的情形下,扫描同样的二维码,点“设备已联网,跳过此步”,直接“发现”、“绑定设备” 即可在公众号菜单“智能设备里控制 | ||
| + | |||
| + | |||
| + | ;;其他说明: | ||
| + | |||
| + | * 短按按钮,手动开关控制器 | ||
| + | * 长按 10 秒按钮,恢复出厂设置 | ||
<br><br> | <br><br> | ||
| − | === | + | == Open API (MQTT) == |
| + | |||
| + | 微信扫码绑定设备后,进入公众号: | ||
| + | |||
| + | |||
| + | * 公众号下面的菜单 "Devices" 列出你所绑定的所有设备 | ||
| + | * 选择您的插座,进入设备控制页 | ||
| + | * 点右上角,在弹出的菜单里选“复制链接” | ||
| + | * 粘贴到浏览器里,访问之,查看页面源码,即可获得你的插座的关键控制参数: | ||
| + | |||
| + | |||
| + | <source lang=php> | ||
| + | var devid = YOUR_DEVICE_ID; | ||
| + | var mqtt_uname = xxxxxxxx; | ||
| + | var mqtt_pass = TTTTTTTTTTTTTTTT; < ---- mqtt server token, 3600s life time | ||
| + | var mqtt_server = xxx.xxx.xxx.xxx; | ||
| + | var mqtt_port = xxx; | ||
| + | </source> | ||
| + | |||
| + | <br><br> | ||
| + | |||
| + | === node.js === | ||
| + | |||
| + | ==== Prepare ==== | ||
| + | |||
| + | Download the node-v6.9.1-xxx.tgz from http://nodejs.org | ||
<source lang=bash> | <source lang=bash> | ||
| − | + | $ tar xf node-v6.9.1-*.tar.xz | |
| − | $ | + | $ sudo cp -a node-v6.9.1*/* /usr/local/ |
| − | $ | + | $ sudo npm install -g MQTTClient |
| − | $ | + | $ sudo npm install -g request |
| − | + | ||
</source> | </source> | ||
| + | <br><br> | ||
| − | + | ==== Turn off ==== | |
| − | + | Turn off the plug throught node.js: | |
| − | + | ||
| − | + | ||
| − | + | * replace the mqtt_uname in line 6 | |
| + | * replace the devid in line 7 | ||
| − | = | + | <source lang=javascript> |
| + | $ cat switch.js | ||
| + | #! /usr/bin/env node | ||
| − | + | // replace it to yours | |
| + | //////////////////////////////////////////////// | ||
| + | var mqtt_uname = "o7okr76757879RfhBs_XM339"; <---- YOUR_mqtt_uname | ||
| + | var devid = "MJD123456789012"; <---- YOUR_devid | ||
| + | //////////////////////////////////////////////// | ||
| − | + | var opt = { | |
| − | + | username: mqtt_uname, | |
| − | $ | + | password: "" |
| + | }; | ||
| + | |||
| + | var mqtt_tx_topic = 'app2dev/' + devid | ||
| + | |||
| + | var args = process.argv.slice(2); | ||
| + | var set_state = args[0]; | ||
| + | |||
| + | if (set_state != 'on' && set_state != 'off') { | ||
| + | console.log("Supported cmd:"); | ||
| + | console.log("\tswitch.js on"); | ||
| + | console.log("\tswitch.js off"); | ||
| + | process.exit(1); | ||
| + | } | ||
| + | |||
| + | console.log("st = " + set_state); | ||
| + | |||
| + | var http_req = require('/usr/local/lib/node_modules/request'); | ||
| + | http_req.post( | ||
| + | 'http://api.noduino.org/user/token', | ||
| + | { json: {user_id: opt.username} }, | ||
| + | function (error, response, body) { | ||
| + | if (!error && response.statusCode == 200) { | ||
| + | console.log(body); | ||
| + | |||
| + | opt.password = body.user_token; | ||
| + | //console.log(opt) | ||
| + | |||
| + | var MQTTClient = require('/usr/local/lib/node_modules/MQTTClient').Client; | ||
| + | var client = new MQTTClient('mqtt.noduino.org', 1883, opt); | ||
| + | client.connect(function () { | ||
| + | console.log("connect ok!"); | ||
| + | |||
| + | var pubopt = { | ||
| + | qos_level: 2 | ||
| + | } | ||
| + | |||
| + | client.publish(mqtt_tx_topic, set_state, pubopt, function (message_id) { | ||
| + | console.log("public ok! message_id = " + message_id); | ||
| + | process.exit(0); | ||
| + | }); | ||
| + | }); | ||
| + | } else { | ||
| + | console.log("Request the user token failed"); | ||
| + | process.exit(1); | ||
| + | } | ||
| + | } | ||
| + | ); | ||
| + | |||
| + | $ ./switch.js off | ||
</source> | </source> | ||
| + | <br><br> | ||
| − | + | ==== Turn On ==== | |
| + | Turn on the plug: | ||
| − | + | <source lang=bash> | |
| + | $ ./switch.js on | ||
| + | </source> | ||
| + | <br><br> | ||
| − | + | ==== Debug ==== | |
| − | + | <font color=red><b>If you get the following error:</b></font> | |
| − | + | <source lang=bash> | |
| − | + | /usr/local/lib/node_modules/MQTTClient/client.js:56 | |
| − | + | throw Error('user names are kept to 12 characters or fewer'); | |
| − | + | ^ | |
| + | Error: user names are kept to 12 characters or fewer | ||
| + | </source> | ||
| − | + | Please patch the /usr/local/lib/node_modules/MQTTClient/client.js to remove the line of checking the length of username and password: | |
| + | <source lang=bash> | ||
| + | --- a/client.js | ||
| + | +++ b/client.js | ||
| + | @@ -52,10 +52,10 @@ var Client = exports.Client = function (host, port, options) { | ||
| + | options.alive_timer = 30; | ||
| + | options.ping_timer = parseInt(options.alive_timer * 0.6 * 1000); | ||
| + | // 用户名和密码 | ||
| + | - if (typeof options.username == 'string' && options.username.length > 12) | ||
| + | - throw Error('user names are kept to 12 characters or fewer'); | ||
| + | - if (typeof options.password == 'string' && options.password.length > 12) | ||
| + | - throw Error('passwords are kept to 12 characters or fewer'); | ||
| + | + //if (typeof options.username == 'string' && options.username.length > 12) | ||
| + | + // throw Error('user names are kept to 12 characters or fewer'); | ||
| + | + //if (typeof options.password == 'string' && options.password.length > 12) | ||
| + | + // throw Error('passwords are kept to 12 characters or fewer'); | ||
| + | // Will flag | ||
| + | if (options.will_flag && (typeof options.will_topic != 'string' || typeof options.will_message != 'string')) | ||
| + | throw Error('missing will_topic or will_message when will_flag is set'); | ||
| + | </source> | ||
| + | |||
| + | <br><br> | ||
| + | |||
| + | === python === | ||
| + | |||
| + | ==== Prepare ==== | ||
<source lang=bash> | <source lang=bash> | ||
| − | $ | + | $ python3 --version |
| + | Python 3.5.3rc1 | ||
| + | |||
| + | $ pip3 install paho-mqtt | ||
| + | Collecting paho-mqtt | ||
| + | Downloading paho-mqtt-1.2.tar.gz (49kB) | ||
| + | 100% |████████████████████████████████| 51kB 308kB/s | ||
| + | Building wheels for collected packages: paho-mqtt | ||
| + | Running setup.py bdist_wheel for paho-mqtt ... done | ||
| + | Stored in directory: /home/comcat/.cache/pip/wheels/fa/db/fb/b495e37057e2f40534726b3c00ab26a58fc80fb8d17223df07 | ||
| + | Successfully built paho-mqtt | ||
| + | Installing collected packages: paho-mqtt | ||
| + | Successfully installed paho-mqtt-1.2 | ||
</source> | </source> | ||
| + | |||
| + | |||
| + | More infor: https://pypi.python.org/pypi/paho-mqtt | ||
<br> | <br> | ||
| − | === | + | ==== Turn off ==== |
| − | + | * replace the mqtt_uname in line 10 | |
| + | * replace the devid in line 11 | ||
| + | <source lang=python> | ||
| + | $ cat switch.py | ||
| + | #!/usr/bin/python3 | ||
| − | + | import json, requests | |
| + | import paho.mqtt.client as mqtt | ||
| + | import sys | ||
| + | # replace it to your id | ||
| + | ########################################### | ||
| + | mqtt_uname = 'o7okr76757879RfhBs_XM339' <---- YOUR_mqtt_uname | ||
| + | devid = 'MJD123456789012' <---- YOUR_devid | ||
| + | ########################################### | ||
| − | + | def help_msg(): | |
| + | print("Supported cmd:") | ||
| + | print("\tswitch.py on") | ||
| + | print("\tswitch.py off") | ||
| − | [ | + | if len(sys.argv) >= 2: |
| + | set_state = sys.argv[1] | ||
| + | else: | ||
| + | help_msg() | ||
| + | sys.exit(-2) | ||
| + | if set_state != 'on' and set_state != 'off': | ||
| + | help_msg() | ||
| + | sys.exit(-2) | ||
| + | |||
| + | url = 'http://api.noduino.org/user/token' | ||
| + | |||
| + | dat = dict ( | ||
| + | user_id = mqtt_uname, | ||
| + | ) | ||
| + | |||
| + | try: | ||
| + | resp = requests.post(url = url, json = dat) | ||
| + | except Exception as e: | ||
| + | print(e) | ||
| + | sys.exit(-1) | ||
| + | |||
| + | p = resp.json() | ||
| + | mqtt_pass = p['user_token'] | ||
| + | |||
| + | mqtt_rx_topic = 'dev2app/' + devid | ||
| + | mqtt_tx_topic = 'app2dev/' + devid | ||
| + | |||
| + | mqtt_host = 'mqtt.noduino.org' | ||
| + | mqtt_port = 1883 | ||
| + | mqtt_msg = set_state | ||
| + | |||
| + | def on_connect(client, u_dat, rc): | ||
| + | if rc == 0: | ||
| + | print("Connected successfully") | ||
| + | else: | ||
| + | print("Connection failed. rc = "+str(rc)) | ||
| + | |||
| + | def on_publish(client, u_dat, rc): | ||
| + | print("Message "+str(rc)+" published.") | ||
| + | |||
| + | def on_subscribe(client, u_dat, mid, qos): | ||
| + | print("Subscribe with "+str(mid)+" received") | ||
| + | |||
| + | def on_message(client, udat, msg): | ||
| + | print("Message received on topic "+msg.topic+" and payload "+str(msg.payload)) | ||
| + | |||
| + | mqttc = mqtt.Client() | ||
| + | |||
| + | mqttc.on_connect = on_connect | ||
| + | mqttc.on_publish = on_publish | ||
| + | mqttc.on_subscribe = on_subscribe | ||
| + | mqttc.on_message = on_message | ||
| + | |||
| + | mqttc.username_pw_set(mqtt_uname, mqtt_pass) | ||
| + | mqttc.connect(mqtt_host, mqtt_port) | ||
| + | |||
| + | mqttc.publish(mqtt_tx_topic, mqtt_msg) | ||
| + | |||
| + | #mqttc.subscribe(mqtt_rx_topic) | ||
| + | #mqttc.loop_forever() | ||
| + | </source> | ||
| − | |||
<source lang=bash> | <source lang=bash> | ||
| − | + | $ ./switch.py off | |
| − | + | ||
| − | + | ||
| − | + | ||
| − | + | ||
| − | + | ||
| − | + | ||
| − | + | ||
| − | + | ||
</source> | </source> | ||
| + | <br> | ||
| − | + | ==== Turn On ==== | |
| + | Turn on the plug: | ||
| − | + | <source lang=bash> | |
| + | $ ./switch.py on | ||
| + | </source> | ||
| + | <br><br> | ||
| − | + | === HTML5 === | |
| + | The device control page in WeChat is a H5 page. Using a MQTT client implement in javascript , using the mqttws31.js library: | ||
| − | + | <source lang=javascript> | |
| + | var client_id = parseInt(Math.random() * 10000, 10) + '_' + mqtt_uname; | ||
| + | var client = new Paho.MQTT.Client(mqtt_server, mqtt_port, "/mqtt", client_id); | ||
| + | var state = 0; | ||
| + | function failConnect(e) { | ||
| + | console.log("connect failed"); | ||
| + | console.log(e); | ||
| + | console.log("reconnecting ..."); | ||
| + | client.connect({userName: mqtt_uname, password: mqtt_pass, onSuccess:onConnect, onFailure: failConnect, mqttVersion:3}); | ||
| + | } | ||
| + | function onConnect() { | ||
| + | console.log("onConnect OK!"); | ||
| + | subscribe('dev2app/' + devid); | ||
| + | } | ||
| + | function subscribe(topic) { | ||
| + | client.subscribe(topic); | ||
| + | } | ||
| + | function onMessageArrived (message) { | ||
| + | // MQTT message from device example: {"m":"status","d":"on","t":"2015-12-30T00:00:00+08:00"} | ||
| + | console.log("Arrived Message: [", message.payloadString, "]"); | ||
| + | try { | ||
| + | job = JSON.parse(message.payloadString); | ||
| + | state = job.d; | ||
| + | } catch(e) { | ||
| + | console.log("JSON object error!"); | ||
| + | alert("JSON error, RX data is: " + message.payloadString); | ||
| + | return; | ||
| + | } | ||
| + | if(state == 'on') { | ||
| + | $('#switch').removeClass('btn_off'); | ||
| + | $('#switch').addClass('btn_on'); | ||
| + | } else if (state == 'off') { | ||
| + | $('#switch').removeClass('btn_on'); | ||
| + | $('#switch').addClass('btn_off'); | ||
| + | } | ||
| + | } | ||
| + | function onDisConnect() { | ||
| + | console.log("reconnecting ..."); | ||
| + | client.connect({userName: mqtt_uname, password: mqtt_pass, onSuccess:onConnect, onFailure: failConnect, mqttVersion:3}); | ||
| + | } | ||
| + | function publish(topic, msg){ | ||
| + | message = new Paho.MQTT.Message(msg); | ||
| + | message.destinationName = topic; | ||
| + | client.send(message); | ||
| + | console.log("publish message ok!"); | ||
| + | } | ||
| + | function init() { | ||
| + | client.connect({userName: mqtt_uname, password: mqtt_pass, onSuccess:onConnect, onFailure: failConnect, mqttVersion:3}); | ||
| + | client.onMessageArrived = onMessageArrived; | ||
| + | client.onConnectionLost = onDisConnect; | ||
| + | } | ||
| + | function toggle() | ||
| + | { | ||
| + | //console.log("toggle_devid = " + devid); | ||
| + | var p_topic = "app2dev/" + devid; | ||
| + | if($('#switch').hasClass('btn_off')) { | ||
| + | //console.log("toggle off, topic = " + p_topic); | ||
| + | publish(p_topic, "on"); | ||
| + | } else if ($('#switch').hasClass('btn_on')) { | ||
| + | //console.log("toggle off, topic = " + p_topic); | ||
| + | publish(p_topic, "off"); | ||
| + | } | ||
| + | } | ||
| + | </source> | ||
| − | + | <br><br> | |
| + | == Open API (HTTP in LAN) == | ||
| − | + | <b style="color:#f00">注意:设备的安全策略借助 WiFi 路由器的密码实现,即:认为被授权连接入 WiFi 路由器的用户,皆为可信用户</b> | |
| − | + | 设备默认开启一个 HTTP 服务,发送如下 http 请求,可完成设备的状态控制,此方式不依赖外网 MQTT 服务,可用作隔离外网环境下的,本地局域网控制: | |
| + | <br> | ||
| − | + | === Get the device IP === | |
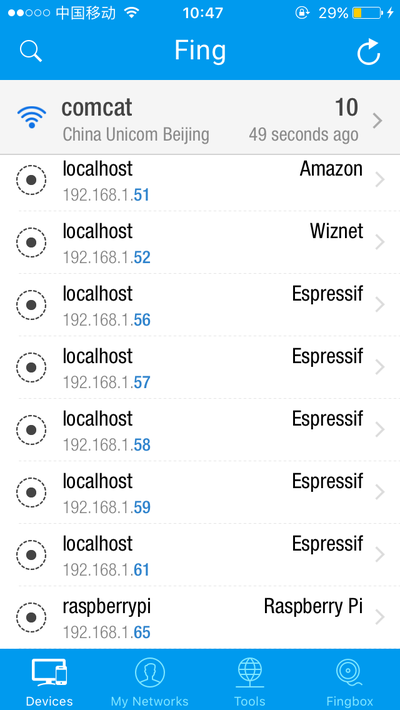
| + | 用一个类似 iOS 下的 APP: Fing | ||
| − | + | 扫描一下局域网,名为 'Espressif' 的设备即为 OpenPlug 设备 | |
| − | [[文件: | + | [[文件:Fing-lan-scan.png | 400px]] |
| + | <br> | ||
| − | + | === Turn On via HTTP in LAN === | |
| + | 192.168.1.75 is the openplug device IP | ||
| − | + | 开启: | |
| + | <source lang=bash> | ||
| + | $ cat plug-on.txt | ||
| + | POST /upnp/control/basicevent1 HTTP/1.1 | ||
| + | Host: 192.168.1.69 | ||
| + | Accept: */* | ||
| + | Content-type: text/xml; charset="utf-8" | ||
| + | Content-Length: 83 | ||
| + | |||
| + | <?xml version="1.0" encoding="utf-8"?><s:Body><BinaryState>1</BinaryState></s:Body> | ||
| + | $ cat plug-on.txt | nc 192.168.1.75 80 | ||
| + | HTTP/1.0 200 OK | ||
| + | Server: lwIP/1.4.0 | ||
| + | Content-type: text/plain | ||
| + | Content-Length: 0 | ||
| + | Connection: close | ||
| + | |||
| + | </source> | ||
| + | |||
| + | <br> | ||
| + | |||
| + | === Turn Off via HTTP in LAN === | ||
| + | |||
| + | 192.168.1.75 is the openplug device IP | ||
| + | |||
| + | 关闭: | ||
| + | |||
| + | <source lang=bash> | ||
| + | $ cat plug-off.txt | ||
| + | POST /upnp/control/basicevent1 HTTP/1.1 | ||
| + | Accept: */* | ||
| + | Content-type: text/xml; charset="utf-8" | ||
| + | Content-Length: 83 | ||
| + | |||
| + | <?xml version="1.0" encoding="utf-8"?><s:Body><BinaryState>0</BinaryState></s:Body> | ||
| + | $ cat plug-off.txt | nc 192.168.1.75 80 | ||
| + | HTTP/1.0 200 OK | ||
| + | Server: lwIP/1.4.0 | ||
| + | Content-type: text/plain | ||
| + | Content-Length: 0 | ||
| + | Connection: close | ||
| + | |||
| + | </source> | ||
| − | |||
<br><br> | <br><br> | ||
| − | == | + | == HomeBridge == |
| − | + | <br><br> | |
| − | + | == Alexa == | |
| + | '''Support Amazon Alexa:''' | ||
| − | + | <br> | |
| + | |||
| + | === Discover === | ||
| + | |||
| + | [[文件:Alexa-noduino-discove.png | 500px]] | ||
| + | |||
| + | <br> | ||
| + | |||
| + | === Turn On === | ||
| + | |||
| + | [[文件:Alexa-openplug-turnon.png | 500px]] | ||
| + | |||
| + | <br> | ||
| + | |||
| + | === Turn Off === | ||
| + | |||
| + | [[文件:Alexa-openplug-turnoff.png | 500px]] | ||
| + | |||
| + | <br><br> | ||
| + | == Hacking == | ||
| − | === | + | === Prepare firmware === |
| − | + | Get noduino-sdk: | |
<source lang=bash> | <source lang=bash> | ||
| 第158行: | 第515行: | ||
| − | + | Generate toolchain (you need Python 2.7): | |
<source lang=bash> | <source lang=bash> | ||
| 第165行: | 第522行: | ||
</source> | </source> | ||
| − | + | Compile Open Plug firmware: | |
<source lang=bash> | <source lang=bash> | ||
| − | $ cd ../sketch/ | + | $ cd ../sketch/open-plug |
$ make | $ make | ||
</source> | </source> | ||
| − | + | The generated firmware is located in build/ dir named user1.bin annnd user2.bin | |
| − | |||
| − | |||
| − | |||
| − | + | Window environment please refer to [[Getting Started with Noduino SDK on Windows]], you can get how to setup the basic developmennt environment | |
| − | + | <br><br> | |
| − | + | === Upload === | |
| − | + | ==== Serial ==== | |
| + | [[文件:Openplug-fw-upload.jpg | 800px]] | ||
| − | |||
| − | + | [[文件:Ft232.jpg | 800px]] | |
| − | + | ||
| − | + | ||
| − | + | ||
| − | |||
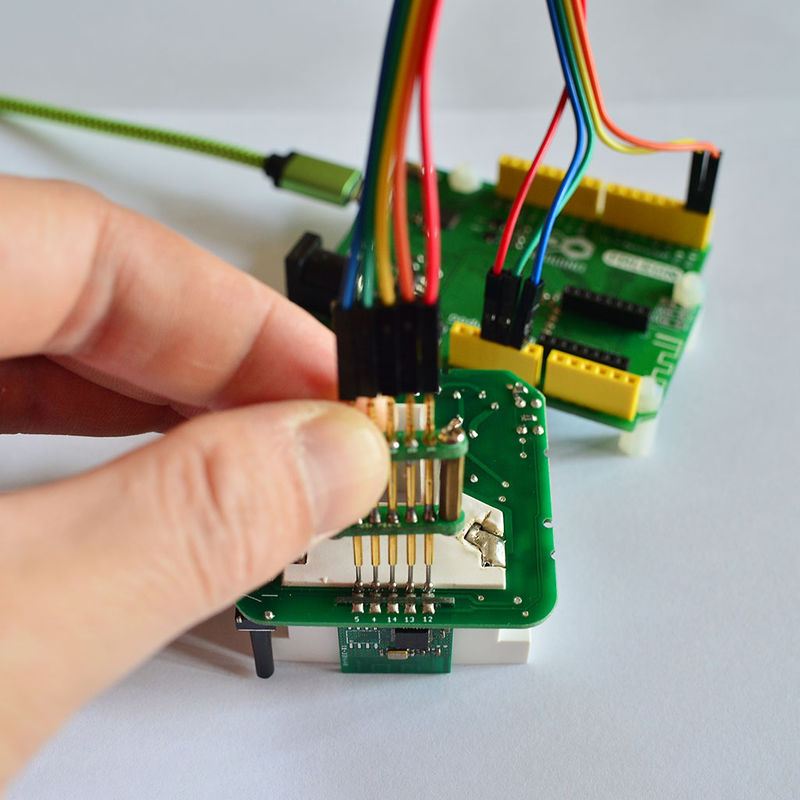
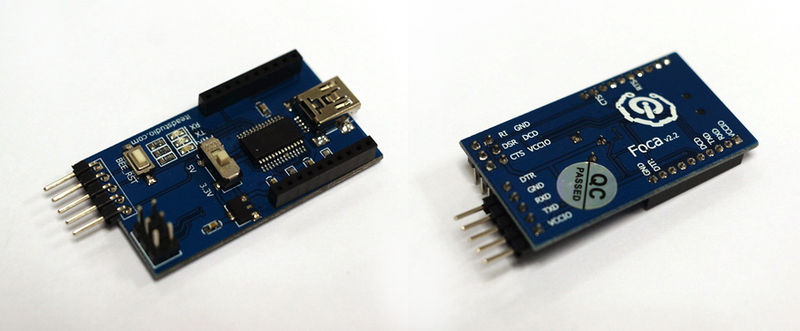
| − | + | * USB2UART_GND ------> SmartNode_GPIO0 | |
| + | * USB2UAR_GND -----> SmartNode_GND | ||
| + | * USB2UAR_RXD -----> SmartNode_TX | ||
| + | * USB2UAR_TXD -----> SmartNode_RX | ||
| − | |||
| − | + | Connect USB2UAR_VCC3.3 -----> SmartNode_VCC at last | |
| + | |||
| + | ESP8285 will be enter upload mode, we can upload the compiled firmware through serial using following commands in Linux: | ||
<source lang=bash> | <source lang=bash> | ||
| − | $ make produce | + | $ cd /path/to/noduino-sdk/sketch/open-plug |
| + | $ make produce ESPPORT=/dev/ttyUSB1 | ||
</source> | </source> | ||
| − | + | ||
| + | In windows: | ||
<source lang=bash> | <source lang=bash> | ||
| 第213行: | 第569行: | ||
</source> | </source> | ||
| − | + | COM7 is your USB2UART device | |
| + | |||
| + | |||
| + | In MAC OS, maybe it's: | ||
| + | |||
| + | <source lang=bash> | ||
| + | $ make produce ESPPORT=/dev/cu.SLAB_USBtoUART | ||
| + | </source> | ||
| + | |||
| + | /dev/cu.SLAB_USBtoUART is your USB2UART device | ||
<br><br> | <br><br> | ||
| − | === | + | ==== Online ==== |
| − | + | ;; Access: http://dev.noduino.org/openonoff | |
| + | |||
| + | ;; Login: | ||
| + | |||
| + | * Username: noduino | ||
| + | * password: noduino1234 | ||
| + | |||
| + | |||
| + | ;; Click the "Add files", select the user1.bin and user2.bin located in /path/to/noduino-sdk/sketch/open-plug/build/ | ||
| + | |||
| + | |||
| + | ;; Then click "Start upload" to upload the user1.bin and user2.bin into the server temporaily | ||
| + | |||
| + | |||
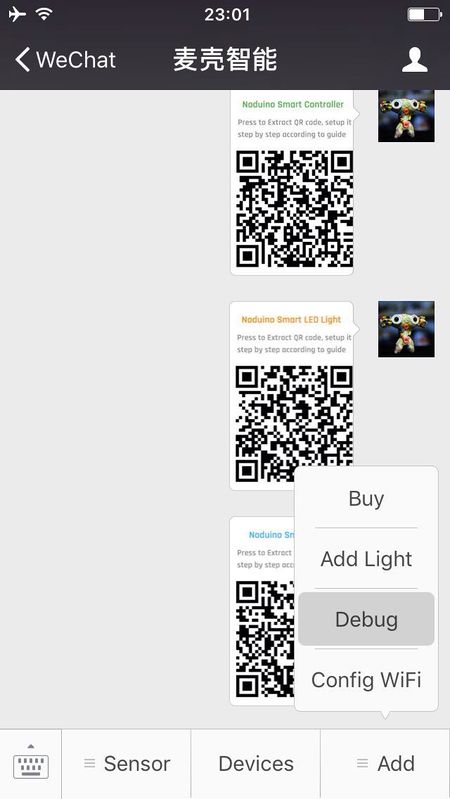
| + | ;; Enter Official Account, then click "Add" menu, enter "Debug" page | ||
| + | |||
| + | [[文件:Maike-upload-online-1.jpg | 450px]] | ||
| + | |||
| + | |||
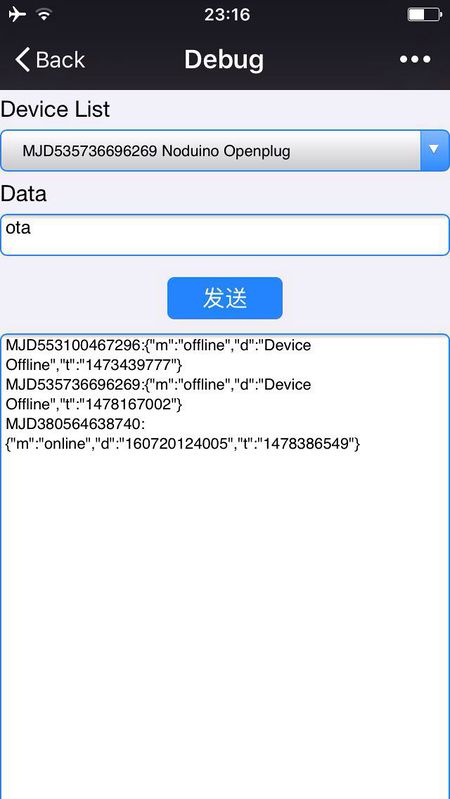
| + | ;; Select your device and the input "ota" in the data aera then click "send data" | ||
| + | |||
| + | |||
| + | [[文件:Maike-upload-online-2.jpg | 450px]] | ||
| + | |||
| + | |||
| + | Device will download your user1.bin or user2.bin and write it into flash when the device received the "ota" message | ||
| + | |||
| + | You will see the device online message in the Debug page when the uploading is finished | ||
<br><br> | <br><br> | ||
| − | == | + | == Hardware == |
| + | |||
| + | [[文件:Open-plug-v0.8-sch.png | 900px]] | ||
| + | |||
| + | |||
| + | |||
| + | [[文件:Open-plug-layout.png | 600px]] | ||
| − | |||
| − | |||
| − | |||
| − | |||
| − | |||
| − | |||
| − | |||
| − | |||
| − | |||
| − | |||
| − | |||
| − | |||
| − | |||
| − | |||
| − | |||
<br><br> | <br><br> | ||
| + | |||
| + | == 参考 == | ||
| + | |||
| + | ;;更多信息访问: | ||
| + | |||
| + | * [[Noduino]] | ||
| + | |||
<br><br> | <br><br> | ||
<br><br> | <br><br> | ||
2017年10月10日 (二) 14:45的最后版本
目录 |
[编辑] 1 Overview
- AC 85V - 250V Smart Plug
- ESP8285 inside
- 250V 10A relay
- Shell size 53mm x 53mm x 27mm
[编辑] 2 Quick Start
- 插座通电,等 6 s 左右,指示灯 1 秒左右慢闪,表示在等待配网
- 如果不在慢闪,长按按钮 10 秒
- 手机连接 2.4G WiFi ,微信扫描二维码,点 "配置设备上网"
- 按提示输入 WiFi 密码,点 “连接”,等待配网完成(注意,设备目前只支持 2.4G,不支持 5G WiFi);此外企业级安全认证也暂不支持)
- WiFi 配置完成后,微信自动进入局域网发现设备模式,其会列出设备列表
- 点击第一个设备,进入页面,在页面最下面会有 “绑定设备” 按钮 (如果已经绑定过改设备,最下面的按钮为“进入公众号”),点击按钮,完成设备绑定
- 完成后,点“进入公众号”,在公众号菜单的 “智能设备”,即可列出你绑定的所有设备,点一个设备,即可进入设备控制页
其他人需要控制设备,需要先连接到同样的路由器,在设备通电的情形下,扫描同样的二维码,点“设备已联网,跳过此步”,直接“发现”、“绑定设备” 即可在公众号菜单“智能设备里控制
- 其他说明:
- 短按按钮,手动开关控制器
- 长按 10 秒按钮,恢复出厂设置
[编辑] 3 Open API (MQTT)
微信扫码绑定设备后,进入公众号:
- 公众号下面的菜单 "Devices" 列出你所绑定的所有设备
- 选择您的插座,进入设备控制页
- 点右上角,在弹出的菜单里选“复制链接”
- 粘贴到浏览器里,访问之,查看页面源码,即可获得你的插座的关键控制参数:
var devid = YOUR_DEVICE_ID;
var mqtt_uname = xxxxxxxx;
var mqtt_pass = TTTTTTTTTTTTTTTT;                           < ---- mqtt server token, 3600s life time
var mqtt_server = xxx.xxx.xxx.xxx;
var mqtt_port = xxx;
[编辑] 3.1 node.js
[编辑] 3.1.1 Prepare
Download the node-v6.9.1-xxx.tgz from http://nodejs.org
$ tar xf node-v6.9.1-*.tar.xz
$ sudo cp -a node-v6.9.1*/*  /usr/local/
$ sudo npm install -g MQTTClient
$ sudo npm install -g request
[编辑] 3.1.2 Turn off
Turn off the plug throught node.js:
- replace the mqtt_uname in line 6
- replace the devid in line 7
$ cat switch.js
#! /usr/bin/env node

// replace it to yours
////////////////////////////////////////////////
var mqtt_uname = "o7okr76757879RfhBs_XM339";     <---- YOUR_mqtt_uname
var devid = "MJD123456789012";                   <---- YOUR_devid
////////////////////////////////////////////////

var opt = {
	username: mqtt_uname,
	password: ""
};

var mqtt_tx_topic = 'app2dev/' + devid

var args = process.argv.slice(2);
var set_state = args[0];

if (set_state != 'on' && set_state != 'off') {
	console.log("Supported cmd:");
	console.log("\tswitch.js on");
	console.log("\tswitch.js off");
	process.exit(1);
}

console.log("st = " + set_state);

var http_req = require('/usr/local/lib/node_modules/request');
http_req.post(
	'http://api.noduino.org/user/token',
	{ json: {user_id: opt.username} },
	function (error, response, body) {
		if (!error && response.statusCode == 200) {
			console.log(body);

			opt.password = body.user_token;
			//console.log(opt)

			var MQTTClient = require('/usr/local/lib/node_modules/MQTTClient').Client;
			var client = new MQTTClient('mqtt.noduino.org', 1883, opt);
			client.connect(function () {
				console.log("connect ok!");

				var pubopt = {
					qos_level:  2
				}

				client.publish(mqtt_tx_topic, set_state, pubopt, function (message_id) {
					console.log("public ok! message_id = " + message_id);
					process.exit(0);
				});
			});
		} else {
			console.log("Request the user token failed");
			process.exit(1);
		}
	}
);

$ ./switch.js off
[编辑] 3.1.3 Turn On
Turn on the plug:
$ ./switch.js on
[编辑] 3.1.4 Debug
If you get the following error:
/usr/local/lib/node_modules/MQTTClient/client.js:56
		throw Error('user names are kept to 12 characters or fewer');
		^

Error: user names are kept to 12 characters or fewer
Please patch the /usr/local/lib/node_modules/MQTTClient/client.js to remove the line of checking the length of username and password:
--- a/client.js
+++ b/client.js
@@ -52,10 +52,10 @@ var Client = exports.Client = function (host, port, options) {
                options.alive_timer = 30;
        options.ping_timer = parseInt(options.alive_timer * 0.6 * 1000);
        // 用户名和密码
-       if (typeof options.username == 'string' && options.username.length > 12)
-               throw Error('user names are kept to 12 characters or fewer');
-       if (typeof options.password == 'string' && options.password.length > 12)
-               throw Error('passwords are kept to 12 characters or fewer');
+       //if (typeof options.username == 'string' && options.username.length > 12)
+       //      throw Error('user names are kept to 12 characters or fewer');
+       //if (typeof options.password == 'string' && options.password.length > 12)
+       //      throw Error('passwords are kept to 12 characters or fewer');
        // Will flag
        if (options.will_flag && (typeof options.will_topic != 'string' || typeof options.will_message != 'string'))
                throw Error('missing will_topic or will_message when will_flag is set');
[编辑] 3.2 python
[编辑] 3.2.1 Prepare
$ python3 --version
Python 3.5.3rc1

$ pip3 install paho-mqtt
Collecting paho-mqtt
  Downloading paho-mqtt-1.2.tar.gz (49kB)
    100% |████████████████████████████████| 51kB 308kB/s
Building wheels for collected packages: paho-mqtt
  Running setup.py bdist_wheel for paho-mqtt ... done
  Stored in directory: /home/comcat/.cache/pip/wheels/fa/db/fb/b495e37057e2f40534726b3c00ab26a58fc80fb8d17223df07
Successfully built paho-mqtt
Installing collected packages: paho-mqtt
Successfully installed paho-mqtt-1.2
More infor: https://pypi.python.org/pypi/paho-mqtt
[编辑] 3.2.2 Turn off
- replace the mqtt_uname in line 10
- replace the devid in line 11
$ cat switch.py
#!/usr/bin/python3

import json, requests
import paho.mqtt.client as mqtt
import sys

# replace it to your id
###########################################
mqtt_uname = 'o7okr76757879RfhBs_XM339'     <---- YOUR_mqtt_uname
devid = 'MJD123456789012'                   <---- YOUR_devid
###########################################

def help_msg():
    print("Supported cmd:")
    print("\tswitch.py on")
    print("\tswitch.py off")

if len(sys.argv) >= 2:
    set_state = sys.argv[1]
else:
    help_msg()
    sys.exit(-2)

if set_state != 'on' and set_state != 'off':
    help_msg()
    sys.exit(-2)

url = 'http://api.noduino.org/user/token'

dat = dict (
        user_id = mqtt_uname,
)

try:
    resp = requests.post(url = url, json = dat)
except Exception as e:
    print(e)
    sys.exit(-1)

p = resp.json()
mqtt_pass = p['user_token']

mqtt_rx_topic = 'dev2app/' + devid
mqtt_tx_topic = 'app2dev/' + devid

mqtt_host = 'mqtt.noduino.org'
mqtt_port = 1883
mqtt_msg = set_state

def on_connect(client, u_dat, rc):
    if rc == 0:
        print("Connected successfully")
    else:
        print("Connection failed. rc = "+str(rc))

def on_publish(client, u_dat, rc):
    print("Message "+str(rc)+" published.")

def on_subscribe(client, u_dat, mid, qos):
    print("Subscribe with "+str(mid)+" received")

def on_message(client, udat, msg):
    print("Message received on topic "+msg.topic+" and payload "+str(msg.payload))

mqttc = mqtt.Client()

mqttc.on_connect = on_connect
mqttc.on_publish = on_publish
mqttc.on_subscribe = on_subscribe
mqttc.on_message = on_message

mqttc.username_pw_set(mqtt_uname, mqtt_pass)
mqttc.connect(mqtt_host, mqtt_port)

mqttc.publish(mqtt_tx_topic, mqtt_msg)

#mqttc.subscribe(mqtt_rx_topic)
#mqttc.loop_forever()
$ ./switch.py off
[编辑] 3.2.3 Turn On
Turn on the plug:
$ ./switch.py on
[编辑] 3.3 HTML5
The device control page in WeChat is a H5 page. Using a MQTT client implement in javascript , using the mqttws31.js library:
var client_id = parseInt(Math.random() * 10000, 10) + '_' + mqtt_uname;
var client = new Paho.MQTT.Client(mqtt_server, mqtt_port, "/mqtt", client_id);
var state = 0;
function failConnect(e) {
	console.log("connect failed");
	console.log(e);
	console.log("reconnecting ...");
	client.connect({userName: mqtt_uname, password: mqtt_pass, onSuccess:onConnect, onFailure: failConnect, mqttVersion:3});
}
function onConnect() {
	console.log("onConnect OK!");
	subscribe('dev2app/' + devid);
}
function subscribe(topic) {
	client.subscribe(topic);
}
function onMessageArrived (message) {
	// MQTT message from device example: {"m":"status","d":"on","t":"2015-12-30T00:00:00+08:00"}
	console.log("Arrived Message: [", message.payloadString, "]");
	try {
		job = JSON.parse(message.payloadString);
		state = job.d;
	} catch(e) {
		console.log("JSON object error!");
		alert("JSON error, RX data is: " + message.payloadString);
		return;
	}
	if(state == 'on') {
		$('#switch').removeClass('btn_off');
		$('#switch').addClass('btn_on');
	} else if (state == 'off') {
		$('#switch').removeClass('btn_on');
		$('#switch').addClass('btn_off');
	}
}
function onDisConnect() {
	console.log("reconnecting ...");
	client.connect({userName: mqtt_uname, password: mqtt_pass, onSuccess:onConnect, onFailure: failConnect, mqttVersion:3});
}
function publish(topic, msg){
	message = new Paho.MQTT.Message(msg);
	message.destinationName = topic;
	client.send(message);
	console.log("publish message ok!");
}
function init() {
	client.connect({userName: mqtt_uname, password: mqtt_pass, onSuccess:onConnect, onFailure: failConnect, mqttVersion:3});
	client.onMessageArrived = onMessageArrived;
	client.onConnectionLost = onDisConnect;
}
function toggle()
{
	//console.log("toggle_devid = " + devid);
	var p_topic = "app2dev/" + devid;
	if($('#switch').hasClass('btn_off')) {
		//console.log("toggle off, topic = " + p_topic);
		publish(p_topic, "on");
	} else if ($('#switch').hasClass('btn_on')) {
		//console.log("toggle off, topic = " + p_topic);
		publish(p_topic, "off");
	}
}
[编辑] 4 Open API (HTTP in LAN)
注意:设备的安全策略借助 WiFi 路由器的密码实现,即:认为被授权连接入 WiFi 路由器的用户,皆为可信用户
设备默认开启一个 HTTP 服务,发送如下 http 请求,可完成设备的状态控制,此方式不依赖外网 MQTT 服务,可用作隔离外网环境下的,本地局域网控制:
[编辑] 4.1 Get the device IP
用一个类似 iOS 下的 APP: Fing
扫描一下局域网,名为 'Espressif' 的设备即为 OpenPlug 设备
[编辑] 4.2 Turn On via HTTP in LAN
192.168.1.75 is the openplug device IP
开启:
$ cat plug-on.txt
POST /upnp/control/basicevent1 HTTP/1.1
Host: 192.168.1.69
Accept: */*
Content-type: text/xml; charset="utf-8"
Content-Length: 83

<?xml version="1.0" encoding="utf-8"?><s:Body><BinaryState>1</BinaryState></s:Body>
$ cat plug-on.txt | nc 192.168.1.75 80
HTTP/1.0 200 OK
Server: lwIP/1.4.0
Content-type: text/plain
Content-Length: 0
Connection: close
[编辑] 4.3 Turn Off via HTTP in LAN
192.168.1.75 is the openplug device IP
关闭:
$ cat plug-off.txt
POST /upnp/control/basicevent1 HTTP/1.1
Accept: */*
Content-type: text/xml; charset="utf-8"
Content-Length: 83

<?xml version="1.0" encoding="utf-8"?><s:Body><BinaryState>0</BinaryState></s:Body>
$ cat plug-off.txt | nc 192.168.1.75 80
HTTP/1.0 200 OK
Server: lwIP/1.4.0
Content-type: text/plain
Content-Length: 0
Connection: close
[编辑] 5 HomeBridge
[编辑] 6 Alexa
Support Amazon Alexa:
[编辑] 6.1 Discover
[编辑] 6.2 Turn On
[编辑] 6.3 Turn Off
[编辑] 7 Hacking
[编辑] 7.1 Prepare firmware
Get noduino-sdk:
$ git clone --recursive git://github.com/icamgo/noduino-sdk.git noduino-sdk
Generate toolchain (you need Python 2.7):
$ cd noduino-sdk/toolchain
$ ./gen.py
Compile Open Plug firmware:
$ cd ../sketch/open-plug
$ make
The generated firmware is located in build/ dir named user1.bin annnd user2.bin
Window environment please refer to Getting Started with Noduino SDK on Windows, you can get how to setup the basic developmennt environment
[编辑] 7.2 Upload
[编辑] 7.2.1 Serial
- USB2UART_GND ------> SmartNode_GPIO0
- USB2UAR_GND -----> SmartNode_GND
- USB2UAR_RXD -----> SmartNode_TX
- USB2UAR_TXD -----> SmartNode_RX
Connect USB2UAR_VCC3.3 -----> SmartNode_VCC at last
ESP8285 will be enter upload mode, we can upload the compiled firmware through serial using following commands in Linux:
$ cd /path/to/noduino-sdk/sketch/open-plug
$ make produce ESPPORT=/dev/ttyUSB1
In windows:
$ make produce ESPPORT=COM7
COM7 is your USB2UART device
In MAC OS, maybe it's:
$ make produce ESPPORT=/dev/cu.SLAB_USBtoUART
/dev/cu.SLAB_USBtoUART is your USB2UART device
[编辑] 7.2.2 Online
- Login
- Username: noduino
- password: noduino1234
- Click the "Add files", select the user1.bin and user2.bin located in /path/to/noduino-sdk/sketch/open-plug/build/
- Then click "Start upload" to upload the user1.bin and user2.bin into the server temporaily
- Enter Official Account, then click "Add" menu, enter "Debug" page
- Select your device and the input "ota" in the data aera then click "send data"
Device will download your user1.bin or user2.bin and write it into flash when the device received the "ota" message
You will see the device online message in the Debug page when the uploading is finished
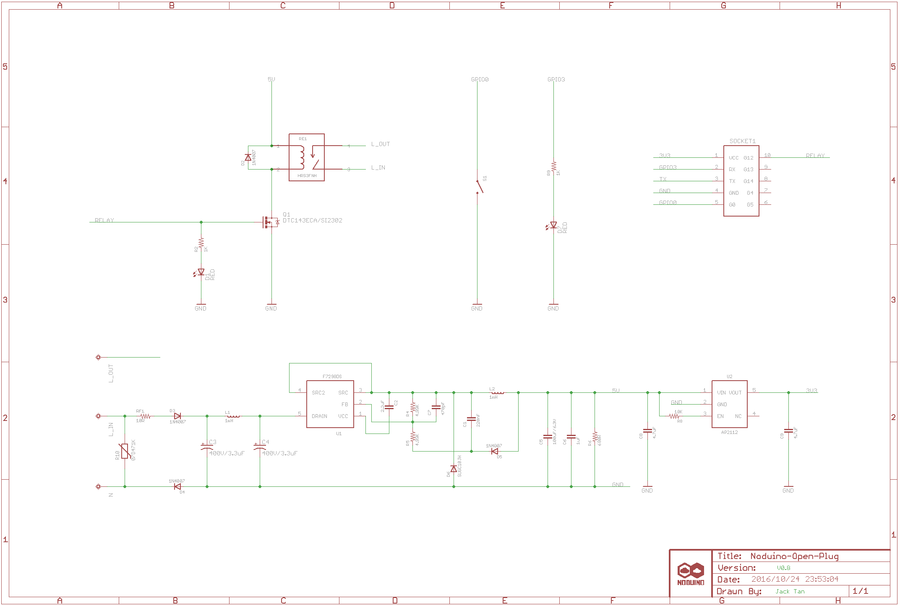
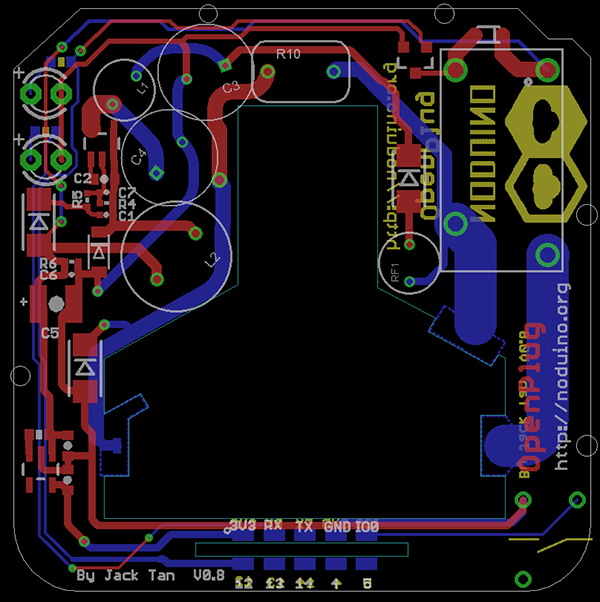
[编辑] 8 Hardware
[编辑] 9 参考
- 更多信息访问:
