迷你看门狗
目录 |
1 主控SoC
1.1 概述
- Tensilica Xtensa LX3 32-bit RISC SOC clocked at 80 MHz
- 32-bit ALU
- 16, 32 or 64 GPR
- six special purpose registers
- 80 base instructions
The Xtensa ISA employs 24-bit instructions with 16-bit narrow encodings for the most common instructions.
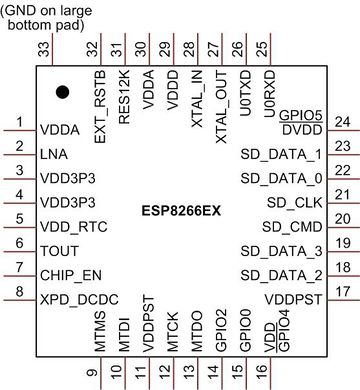
1.2 管脚定义
- PIN8 --- GPIO16 / Deep-Sleep Wakeup
- PIN9 --- GPIO14 / HSPICLK
- PIN10 --- GPIO12 / HSPIQ
- PIN12 --- GPIO13 / HSPID
- PIN13 --- GPIO15 / HSPICS
- PIN14 --- GPIO2 / UART TX during flash programming
- PIN15 --- GPIO0 / SPICS2
- PIN16 --- GPIO4
- PIN24 --- GPIO5
- PIN25 --- GPIO3 / UART RX during flash programming / URXD
- PIN26 --- GPIO1 / SPICS1 / UTXD
1.3 UART
- UART0
U0TXD --- PIN26
U0RXD --- PIN25
U0CTS --- PIN12 (MTCK)
U0RTS --- PIN13 (MTDO)
After calling void system_uart_swap():
U0TXD --- PIN13 (MTDO)   ---> Output pin, NOT be pulled up externally in the initiallization stage
U0RXD --- PIN12 (MTCK)
U0CTS --- PIN25
U0RTS --- PIN26
- UART1
- -- Only ouput pin, used for printing of debug information
U1TXD --- PIN14 (GPIO2)
1.4 Toolchain
2 基本布局
一个蓝色高亮 LED,接着 UTXD 上
一颗 12V 电池
一个 SPI Flash 25Q40B (4Mbit, 512KB)
一颗 8266
重启拔电池即可
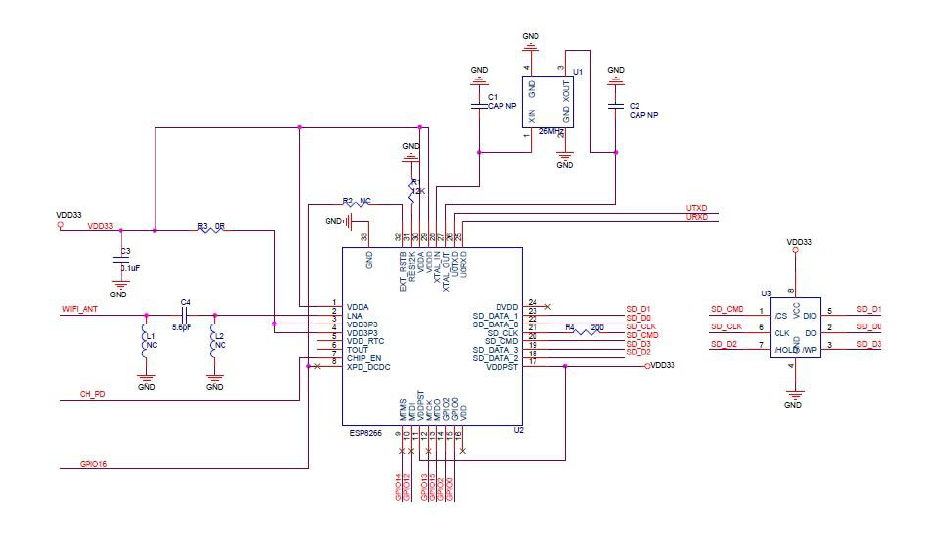
官方参考设计:
UTX / GPIO1   ---  Blue LED
GPIO2
GPIO0
URX / GPIO3
正常运行: RESET, CH_EN 拉高, GPIO2 拉高 + GPIO0 拉高 (GPIO15/MTDO 拉低)
刷 Flash: RESET, CH_EN 拉高, GPIO2 拉高 + GPIO0 拉低 (GPIO15/MTDO 拉低)
GPIO2, GPIO0 和 GPIO3 (U0RXD) 用作 GPIO 要留意,外围电路,有可能影响其状态,造成正常启动失败
- 应避免使用 GPIO0, GPIO2, GPIO15
3 LT01 模块
LT01 V1.3 ,专为彩色 LED 调光专用
- PIN9 --- GPIO14 / HSPICLK ------> White
- PIN10 --- GPIO12 / HSPIQ ------> Blue
- PIN12 --- GPIO13 / HSPID ------> Green
- PIN13 --- GPIO15 拉低
- PIN16 --- GPIO4 ------> Red
4 Web Server API
4.1 client info
$ curl -X GET http://192.168.1.112/client?command=info                                              {
"Version":{
"hardware":"0.3",
"software":"0.9.3"
},
"Device":{
"product":"Humiture",
"manufacturer":"Espressif Systems"
}
}
4.2 client status
$ curl -X GET http://192.168.1.112/client?command=status
{
"Status":{
"status":40
}
}
4.3 client scan
$ curl -X GET http://192.168.1.112/client?command=scan
{
"Response":{
"TotalPage":2
}
}
4.4 config wifi
$ curl -X GET http://192.168.1.112/config?command=wifi
{
"Response":{
"Station":{
"Connect_Station":{
"ssid":"HOME-WIFI",
"password":"xxxxxxxx"
},
"Ipinfo_Station":{
"ip":"192.168.1.112",
"mask":"255.255.255.0",
"gw":"192.168.1.1"
}
},
"Softap":{
"Connect_Softap":{
"authmode":"OPEN",
"channel":11,
"ssid":"ESP_9CCF90",
"password":""
},
"Ipinfo_Softap":{
"ip":"192.168.4.1",
"mask":"255.255.255.0",
"gw":"192.168.4.1"
}
}
}
4.5 config switch
$ curl -X GET http://192.168.1.112/config?command=switch
{
"Response":{
"status":0
}
}

$ curl -X POST -d '{"Request":{"status": 3}}' http://192.168.1.112/config?command=switch
4.6 config light
$ curl -X GET http://192.168.1.112/config?command=light
{
"freq":0,
"rgb":{
"red":0,
"green":0,
"blue":0
}
}
4.7 config reboot
$ curl -X GET http://192.168.1.112/config?command=reboot
4.8 config sleep
$ curl -X POST http://192.168.1.112/config?command=sleep
4.9 设置 station 模式
设备默认为softAP模式,设置 station 模式需先用PC或手机 WiFi 连接到设备,然后从手机或PC端发送下述指令:
$ curl -X POST -H "Content-Type:application/json" -d '{"Request":{"Station":
{"Connect_Station":{"ssid":"comcat","password":"12345678"}}}}' http://192.168.1.112/config?command=wifi
设置完成后设备自动重启,进入station 模式,并自动去连接所设置的路由
注:token 字段和espressif 服务器架构相关,是随机的长度为40 的
4.10 设置 softAP 模式
设备发送如下指令,从 station 模式切回 softAP 模式:
$ curl -X POST -H "Content-Type:application/json" -d '  \
{"Request":{"Softap":{"Connect_Softap":{"authmode":"OPEN","channel":6,"ssid":"mini-CamGo","password":""}}}}'  \
http://192.168.10.213/config?command=wifi
注意:
- Authmode 支持OPEN、WPAPSK、WPA2PSK、WPAPSK/WPA2PSK。
- password 长度需不小于8 个字符
4.11 恢复出厂设置
$ curl -X POST -H "Content-Type:application/json" -d '{"factory":1}' http://IP/config?command=param
4.12 系统复位
$ curl -X POST -H "Content-Type:application/json" -d '{"reset":1}' http://IP/config?command=param
4.13 获取模块上电运行时间
$ curl -X GET http://IP/config?command=systime
4.14 串口波特率
$ curl -X POST -H "Content-Type:application/json" -d '{" uartbaud":baudrate}' http://IP/config?command=param
其中baudrate 代表要设置的波特率。 { “response”:{ “systime”:11111 } }
4.15 设置dataserver 端口
$ curl -X POST -H "Content-Type:application/json" -d '{" dataport":port}' http://IP/config?command=param
其中port 代表要设置的端口号
5 SDK API
5.1 GPIO
5.1.1 PIN Macro
PIN_PULLUP_DIS(PERIPHS_IO_MUX_GPIO2_U);
PIN_PULLUP_EN(PERIPHS_IO_MUX_GPIO4_U);
PIN_PULLDWN_DIS(PERIPHS_IO_MUX_U0TXD_U);
PIN_PULLDWN_EN(PERIPHS_IO_MUX_GPIO5_U);
PIN_FUNC_SELECT(PERIPHS_IO_MUX_MTDI_U, FUNC_GPIO12); // 选择 MTDI 脚复用为 GPIO12,大量管脚有多个功能,需用此宏选择具体的管脚功能
参考 SDK_DIR/include/eagle_soc.h
5.1.2 gpio_output_set
gpio_output_set(u32 set_mask, u32 clear_mask, u32 enable_mask, u32 disable_mask)
- set_mask: 设置输出为高的位,对应位为 1 输出高,对应位为 0 不改变状态
- clear_mask: 设置输出为低的位,对应位为 1 输出低,对应位为 0 不改变状态
- enable_mask: 设置使能输出的位
- disable_mask: 设置使能输入的位
#include <gpio.h>

// Initialize the GPIO subsystem.
gpio_init();

GPIO_REG_READ(GPIO_OUT_ADDRESS) & BIT2 == 1

//Set GPIO2 to output mode
PIN_FUNC_SELECT(PERIPHS_IO_MUX_GPIO2_U, FUNC_GPIO2);

//Set GPIO2 low
gpio_output_set(0, BIT2, BIT2, 0);

//Set GPIO0 to HIGH
gpio_output_set(BIT2, 0, BIT2, 0);

//Set GPIO12 to HIGH, GPIO13 to LOW
gpio_output_set(BIT12, BIT13, BIT12|BIT13, 0);
有个简化的宏:GPIO_OUTPUT_SET(gpio_no, bit_value);
还有一个: GPIO_DIS_OUTPUT(gpio_no);
GPIO_OUTPUT_SET(0, 1); // set gpio0 to 1
GPIO_DIS_OUTPUT(0);    // disable the GPIO0 output (change to input)
- 注意:批量输出时(同时操作四个 GPIO 口),使用 GPIO_OUTPUT_SET 要留意,宏堆叠有些奇怪现象:
GPIO14, 12, 13, 15 同时操作时,只有第一个 GPIO(14) 能改变状态,貌似被优化了还是咋的
GPIO5, 4, 14, 12 同时操作时,现象同上
GPIO1, 2, 0, 3 同时操作时,最后一个 GPIO (3) 无法改变状态
5.1.3 GPIO_INPUT_GET
GPIO_INPUT_GET(gpio_no);
GPIO_INPUT_GET(2);
等效于:
GPIO_REG_READ(GPIO_OUT_ADDRESS) & BIT2
5.1.4 GPIO 中断相关
ETS_GPIO_INTR_ATTACH(func, arg);

ETS_GPIO_INTR_DISABLE();

EST_GPIO_INTR_ENABLE();


void gpio_pin_intr_state_set(u32 gpio_no, GPIO_INT_TYPE stat);

typedef enum {
    GPIO_PIN_INTR_DISABLE = 0,
    GPIO_PIN_INTR_POSEDGE = 1,
    GPIO_PIN_INTR_NEGEDGE = 2,
    GPIO_PIN_INTR_ANYEDGE = 3,
    GPIO_PIN_INTR_LOLEVEL = 4,
    GPIO_PIN_INTR_HILEVEL =5
} GPIO_INT_TYPE;


/*
 * Register an application-specific interrupt handler for GPIO pin
 * interrupts.  Once the interrupt handler is called, it will not
 * be called again until after a call to gpio_intr_ack.  Any GPIO
 * interrupts that occur during the interim are masked.
 *
 * The application-specific handler is called with a mask of
 * pending GPIO interrupts.  After processing pin interrupts, the
 * application-specific handler may wish to use gpio_intr_pending
 * to check for any additional pending interrupts before it returns.
 */
void gpio_intr_handler_register(gpio_intr_handler_fn_t fn, void *arg);

typedef void (* gpio_intr_handler_fn_t)(uint32 intr_mask, void *arg);

/* Determine which GPIO interrupts are pending. */
uint32 gpio_intr_pending(void);

/*
 * Acknowledge GPIO interrupts.
 * Intended to be called from the gpio_intr_handler_fn.
 */
void gpio_intr_ack(uint32 ack_mask);

void gpio_pin_wakeup_enable(uint32 i, GPIO_INT_TYPE intr_state);

void gpio_pin_wakeup_disable();
GPIO 中断处理:
uint32 gpio_status;

gpio_status = GPIO_REG_READ(GPIO_STATUS_ADDRESS);

//clear interrupt status
GPIO_REG_WRITE(GPIO_STATUS_W1TC_ADDRESS, gpio_status);
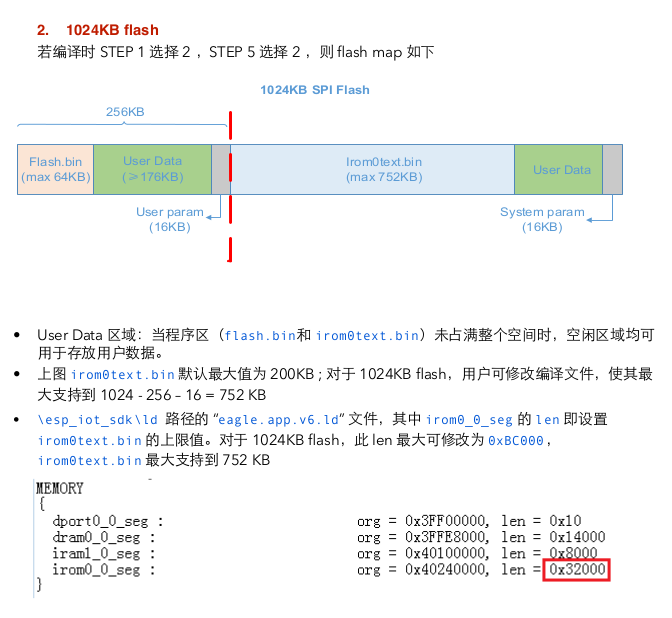
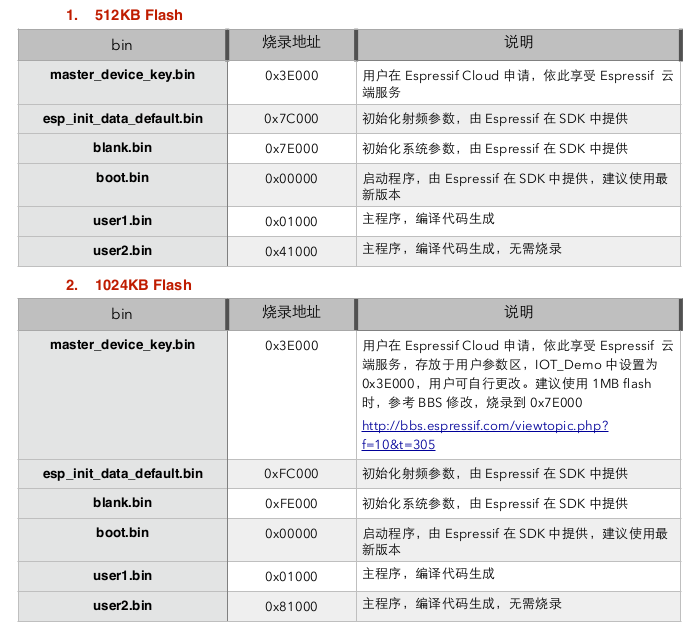
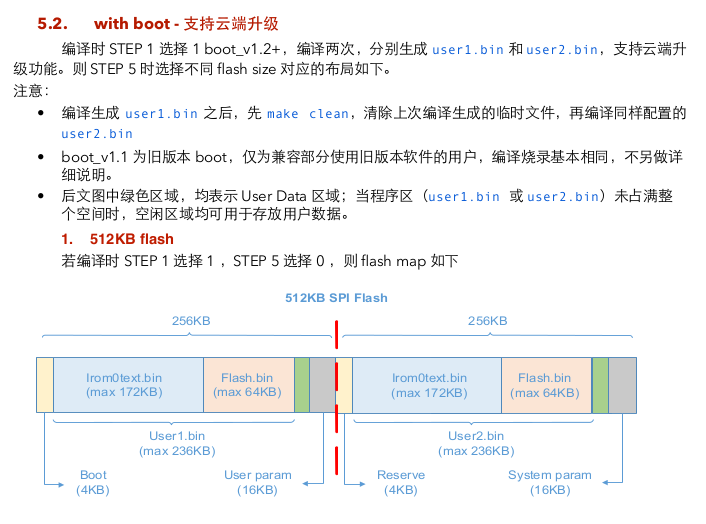
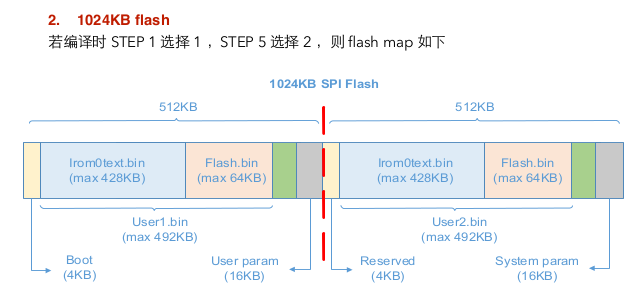
6 Flash Layout
4KB 为一个扇区 (Sector)
iBaihe 的参数: 0x3C * 4KB = 0x3C000
COS Platform 参数:
(0x3C + 1) * 4KB = 0x3D000 (SAVE_0)
(0x3C + 2) * 4KB = 0x3E000 (SAVE_1)
(0x3C + 3) * 4KB = 0x3F000 (PARAM_FLAG)
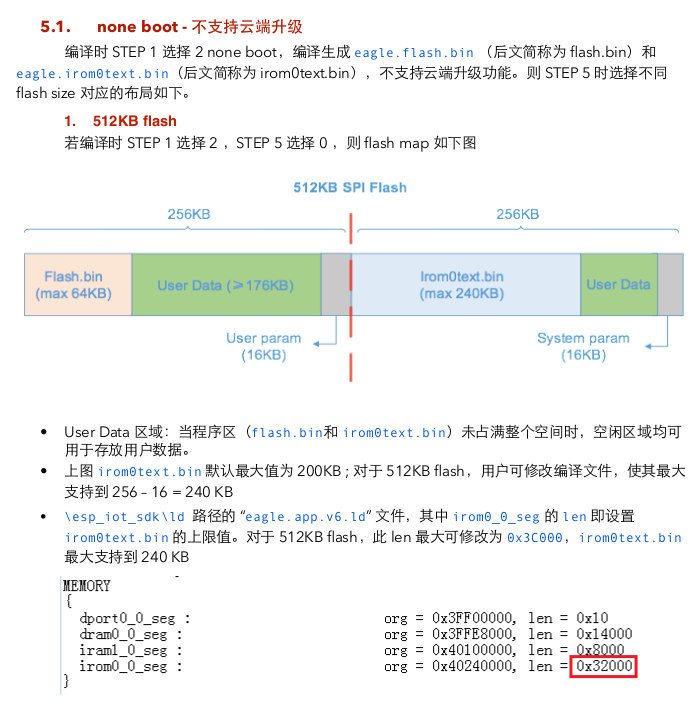
- 系统参数区 (System param) 始终为 Flash 的最后 16KB
- 用户参数区 (User param) 指 Espressif 提供的示例 (IOT_Demo / AT) 中设定的用户参数区
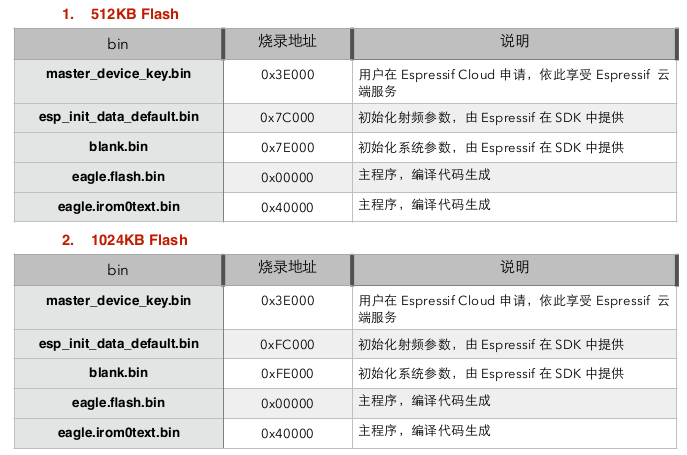
6.1 Without OTA
Address	Size	Name	                        Description
00000h	4k	boot.bin	                Bootloader

3C000h	14k	Param Start Sector
3D000h  1x4k    Param Saved 0
3E000h  1x4k    Param Saved 1
3F000h  1x4k    Param Flag

40000h	240k	app.v6.irom0text.bin	        SDK libraries
7C000h	8k	esp_init_data_default.bin	Default configuration
7E000h	8k	blank.bin	                Filled with FFh. May be WiFi configuration
6.2 With OTA
6.3 批量参数区设计
出厂时,Param_Saved0 写入 sn,activeflag=0, token为空,pubkey为空
APP 传递 AP ssid 和 password 时,同时调用web api,将生成的 prikey & pubkey 传给 mini,mini收到后,将 prikey 写入 flash 的 token 域,pubkey 写入pubkey
出厂时,Param_Saved0 写入 sn, pubkey, MAC, activeflag=0
APP 传递 AP ssid 和 password 即完成添加,X2 连上 WiFi 后,向云端 push 一条消息,告诉云端:“我已激活” 即OK
激活时,将 sn, pubkey, mac 作为参数传给云端
激活时,将 sn 与 token 作为参数传给云端
7 FW 设计
Flash 存 SN, PubKey, MAC; 额外留一个 active flag 位,初始值为 0xFF / 0x00
有 key 的设备,长按则恢复出厂设置,即:清除配置的 ssid & password,置 active flag 为 0
设置 activeflag 为 0 伴谁的操作就是:
    cos_set_active(0);
    system_restore();
    system_restart();
然后系统重新启动,进入 cos_init() 判断 activeflag 为 0 则 wifi_set_opmode(STATIONAP_MODE); 等待直连,设置 ssid & password
8 资源

