Arduino 监控客厅温度湿度
来自Jack's Lab
有了 DHT21/AM2301 数字温湿度传感器 就能把读取的温湿度数据,通过 Ethernet (使用 ENC28J60)上传到服务器上呈现出来
Ethernet 部分的线路连接,可以参考:Arduino Ethernet 的另一性价比选择
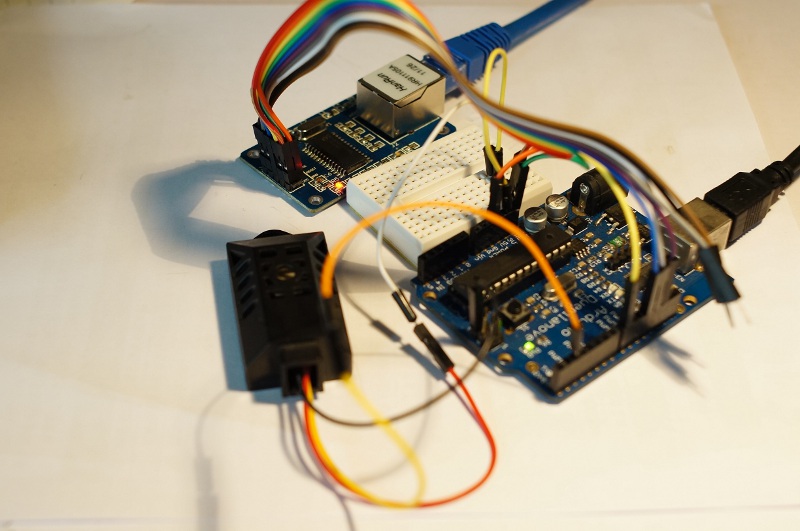
DH21 传感器模块,供电电压也用 3.3V,Arduino 核心板只有 1 pin 的 3.3V 电压输出,因此我们把它接到小面包板上,让 ENC28J60 和 DH21 共同使用。
DH21 的数据接到数字 I/O pin 2 上
接好的图如下:
比较早的开始提供传感器数据存储和呈现服务的提供商是 pachube (现在改名叫cosm)
国内有一个模仿,叫 yeelink,我们以 Yeelink 为例,来解析数据上传的过程
他们都提供 http API,来访问、修改、存储数据,api 很简单,一看就懂 Yeelink API Cosm API
对于 yeelink,在用户中心创建了设备和传感器后,得到一个传感器的 URL: http://api.yeelink.net/v1.0/device/462/sensor/907/datapoints ,就可发一个如下 http 请求上传数据了:
POST /v1.0/device/462/sensor/907/datapoints HTTP/1.1
Host: api.yeelink.net
Accept: */*
U-ApiKey: xxxxxxxxYOUR_API_KEYxxxxxxxxx
Content-Length: 13
Content-Type: application/x-www-form-urlencoded

{"value": 30}
如下命令即发送上面的 http 请求:
curl --request POST --data-binary "{\"value\": 30}" --header "U-ApiKey: YOUR_API_KEY_HERE"    \
http://api.yeelink.net/v1.0/device/462/sensor/907/datapoints
Arduino 下使用 ethercard 库,可直接使用 httpPost() 这个函数来发数据,很方便。
撰写程序,Ethernet 直接用 ethercard 库,DH21 则用我们封装好的库 撰写自己的 Arduino 库
#include <EtherCard.h>
#include <dh21.h>

#define TEMP_TYPE    1
#define HUMI_TYPE    2

// pin 2 is connected to DH21
DH21 dh21(2);
char temp[10];

/*
 * ATmega1280/2560: MOSI --> 51; MISO --> 52; SCK --> 53, SS --> 8
 * Others: MOSI --> 11; MISO --> 12; SCK --> 13, SS --> 8
*/

// ethernet interface mac address
static byte mymac[] = {0x04,0x69,0x69,0x2b,0x30,0x31};
static byte myip[] = {192,168,1,253};
static byte gwip[] = {192,168,1,1};
static byte dnsip[] = {192,168,1,1};

// remote website name
char website[] PROGMEM = "api.yeelink.net";
static byte cloud_ip[] = {202,136,56,203};

char temp_urlBuf[] PROGMEM = "/v1.0/device/462/sensor/907/datapoints";
char humi_urlBuf[] PROGMEM = "/v1.0/device/462/sensor/908/datapoints";
char apiKey[] PROGMEM = "U-ApiKey: 9594675aea73335d031273a1f2ce8eb8";

byte Ethernet::buffer[400];   // a very small tcp/ip buffer is enough here


// 数据发送间隔时间,yeelink 的两次数据上传间隔要大于 10s
#define REQUEST_RATE 13000    // 13000ms
static long timer;

uint8_t flag = TEMP_TYPE;
static char buf[20];

// 回调函数,打印出服务器的返回字符串
static void cb_debug (byte status, word off, word len)
{
  Serial.print("\n--> server response ");
  Serial.print(millis() - timer);
  Serial.println(" ms");
  Serial.println((const char*) Ethernet::buffer + off);
}

void setup ()
{
  Serial.begin(9600);
  Serial.println("\nSet gateway ip, interface ip\n");

  if (ether.begin(sizeof Ethernet::buffer, mymac) == 0)
    Serial.println( "\nFailed to access Ethernet controller");

  //config network interface
  ether.staticSetup(myip, gwip, dnsip);

  // resolve the server domain name
  if (!ether.dnsLookup(website))
    Serial.println("DNS failed");
  else
    memcpy(ether.hisip, cloud_ip, 4);

  ether.printIp("Server IP is: ", ether.hisip);

  // testing the gateway internection
  while (ether.clientWaitingGw())
    ether.packetLoop(ether.packetReceive());

  Serial.println("Gateway found");

  // 初始化计时变量
  timer = - REQUEST_RATE;
}

void loop ()
{
  ether.packetLoop(ether.packetReceive());

  // 间隔时间大于 13s 时才向服务器发送数据
  if (millis() > timer + REQUEST_RATE) {

    // 更新计时变量
    timer = millis();

    Serial.println("\n--> Sending Request");

    // 获取传感器数值字符串
    memset(buf, 0, 20);
    get_send_string(buf, flag);

    // 温度和湿度数据交替发送
    switch (flag){
      case TEMP_TYPE:
        ether.httpPost (temp_urlBuf, website, apiKey, buf, cb_debug);
        Serial.println("post temp");
        flag = HUMI_TYPE;
        break;

      case HUMI_TYPE:
        ether.httpPost (humi_urlBuf, website, apiKey, buf, cb_debug);
        Serial.println("post humi");
        flag = TEMP_TYPE;
        break;
    }
  }
}

// 简单的 float to string 类型的转换函数,sprintf() 不可用
char *ftoa(char *a, double f, int precision)
{
  long p[] = {0,10,100,1000,10000,100000,1000000,10000000,100000000};

  char *ret = a;
  long heiltal = (long)f;
  itoa(heiltal, a, 10);
  while (*a != '\0') a++;
  *a++ = '.';
  long desimal = abs((long)((f - heiltal) * p[precision]));
  itoa(desimal, a, 10);
  return ret;
}

void get_send_string(char *p, uint8_t type)
{
  while((dh21.get_data() == -1) || (dh21.data_check() == -1)) delay(1000);

  switch (type) {
    case TEMP_TYPE:

     memset(temp, 0, 10);
     sprintf(p,"{\"value\":%s}", ftoa(temp, dh21.temperature(), 1));
     break;

    case HUMI_TYPE:
     memset(temp, 0, 10);
     sprintf(p,"{\"value\":%s}", ftoa(temp, dh21.humidity(), 1));
     break;
  }

  Serial.println(p);
}
数据上传成功,串口应该有类似如下的输出:
--> server response 127ms
HTTP/1.1 200 OK
Server: nginx/1.0.14
Date: Tue, 25 Sep 2012 05:08:33 GMT
Content-Type: text/html
Connection: keep-alive
X-Powered-By: PHP/5.3.10
Set-Cookie: CAKEPHP=6sjmsggjnudob61so4teq3c202; expires=Wed, 03-Oct-2012 13:08:33 GMT; path=/
P3P: CP="NOI ADM DEV PSAi COM NAV OUR OTRo STP IND DEM"
Vary: Accept-Encoding
Content-Length: 0
即表示数据上传成功
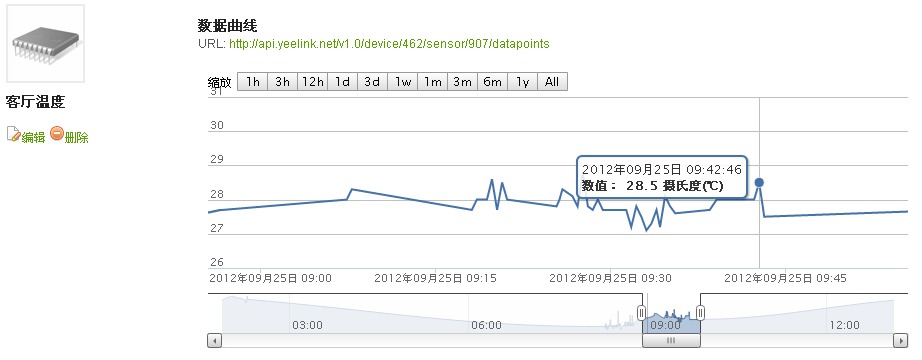
一段时间后,获得的数据曲线如下:
这样我们就可以远程查看家里的温度、湿度了

