ESP32 Partical
来自Jack's Lab
目录 |
1 Overview
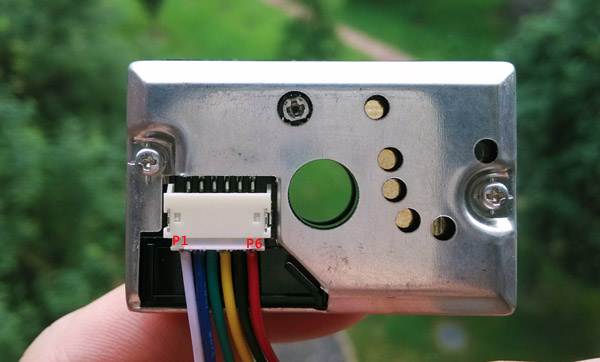
Sharp GP2Y1010AU0F partical sensor
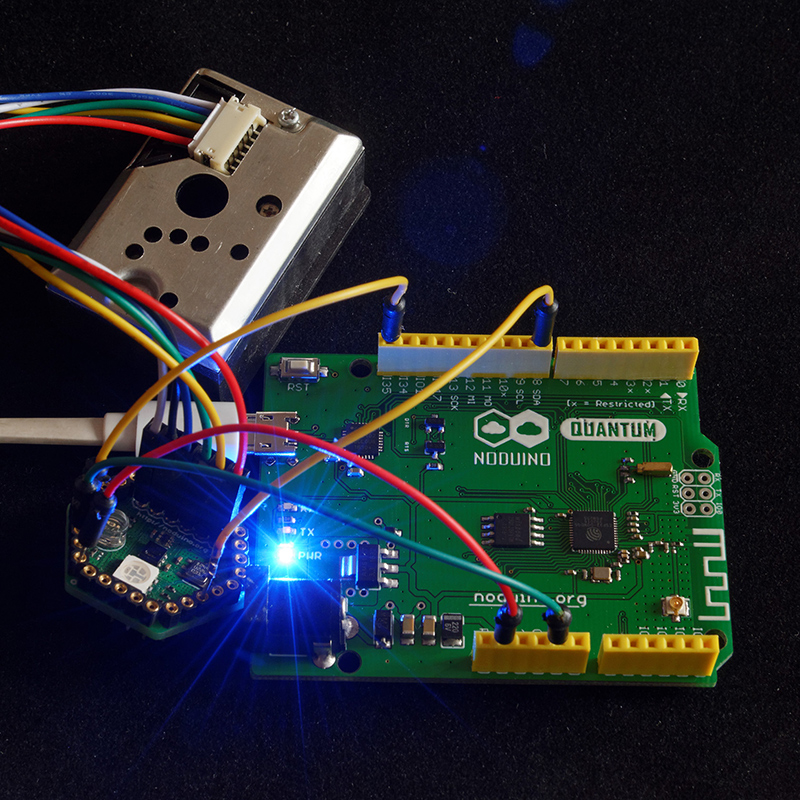
2 Connections
Sharp pin 1 (V-LED)   => 150ohm resister => Quantum_VIN_3V3
Sharp pin 2 (LED-GND) => Quantum_GND
Sharp pin 3 (LED)     => Quantum_D8_IO22
Sharp pin 4 (S-GND)   => Quantum_GND
Sharp pin 5 (Vo)      => Quantum_IO35
Sharp pin 6 (Vcc)     => Quantum_VIN_3V3
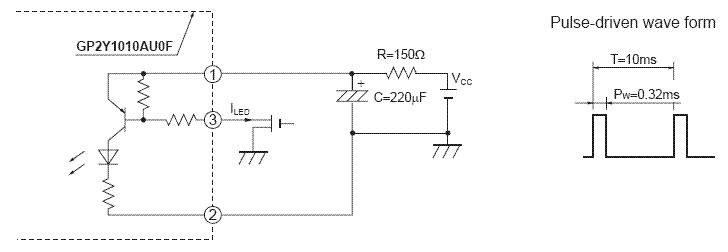
3 Schemmatics
4 Quick Start
4.1 Build
$ sudo apt-get install git wget make libncurses-dev flex bison gperf python python-serial
$ wget https://dl.espressif.com/dl/xtensa-esp32-elf-linux32-1.22.0-59.tar.gz
$ mkdir -p toolchain
$ tar zxf xtensa-esp32-elf-linux32-1.22.0-59.tar.gz -C toolchain
$ export PATH=$PATH:`pwd`/toolchain/xtensa-esp32-elf/bin
$
$ git clone --recursive git://github.com/icamgo/esp-idf.git
$ export IDF_PATH=`pwd`/esp-idf
$ cd esp-idf/examples/11_sharp_dust
$ make menuconfig
$ make -j2
4.2 Upload
$ make flash
You need to press the RST buttom after uploading the firmware into flash. If you guys do not like to do this please patch the /path/to/esp-idf/components/esptool_py/esptool/esptool.py :
diff --git a/esptool.py b/esptool.py
index 755f4cb..ff92c91 100755
--- a/esptool.py
+++ b/esptool.py
@@ -197,6 +197,12 @@ class ESPLoader(object):
               + '\xc0'
         self._port.write(buf)

+    def reset_to_app(self):
+        self._port.setDTR(False)
+        self._port.setRTS(True)
+        time.sleep(0.05)
+        self._port.setRTS(True)
+
     """ Calculate checksum of a blob, as it is defined by the ROM """
     @staticmethod
     def checksum(data, state=ESP_CHECKSUM_MAGIC):
@@ -1421,7 +1427,6 @@ def dump_mem(esp, args):
         sys.stdout.flush()
     print 'Done!'

-
 def write_flash(esp, args):
     """Write data to flash
     """
@@ -1503,6 +1508,7 @@ def write_flash(esp, args):
     if args.verify:
         print 'Verifying just-written flash...'
         verify_flash(esp, args, header_block)
+    esp.reset_to_app()


 def image_info(args):
Then Quantum can reset to run your app automatically after uploading the firmware into flash
4.3 Checking Output
$ picocom -b 115200 /dev/ttyUSB0
ets Jun  8 2016 00:22:57

rst:0x1 (POWERON_RESET),boot:0x13 (SPI_FAST_FLASH_BOOT)
ets Jun  8 2016 00:22:57

rst:0x10 (RTCWDT_RTC_RESET),boot:0x13 (SPI_FAST_FLASH_BOOT)
configsip: 0, SPIWP:0x00
clk_drv:0x00,q_drv:0x00,d_drv:0x00,cs0_drv:0x00,hd_drv:0x00,wp_drv:0x00
mode:QIO, clock div:1
load:0x3ffc0008,len:0
load:0x3ffc0008,len:1964
load:0x40078000,len:3648
ho 0 tail 12 room 4
load:0x40080000,len:256
entry 0x40080034
I (243) heap_alloc_caps: Initializing heap allocator:
I (243) heap_alloc_caps: Region 19: 3FFB1AFC len 0002E504 tag 0
I (244) heap_alloc_caps: Region 25: 3FFE8000 len 00018000 tag 1
I (254) cpu_start: Pro cpu up.
I (260) cpu_start: Single core mode
I (266) cpu_start: Pro cpu start user code
rtc v118 Oct 19 2016 15:22:11
XTAL 40M
I (302) cpu_start: Starting scheduler on PRO CPU.
Welcome to Noduino Quantum
Sharp GP2Y1010AU0F Particle Sensor Example...
Sharp GP2Y1010AU0F Particle Sensor Example...
Partical voltage = 0.49V
Partical voltage = 0.49V
Partical voltage = 0.64V
Partical voltage = 0.57V
Partical voltage = 0.58V
Partical voltage = 0.51V
Partical voltage = 0.57V
Partical voltage = 0.60V
Partical voltage = 0.56V
Partical voltage = 0.58V
Partical voltage = 0.54V
Partical voltage = 0.47V
Partical voltage = 0.67V
Partical voltage = 0.57V
......
......
5 Code Example
#include <stdio.h>
#include <stdlib.h>
#include "freertos/FreeRTOS.h"
#include "freertos/task.h"
#include "soc/rtc_io_reg.h"
#include "esp_system.h"
#include "nvs_flash.h"
#include "driver/gpio.h"

enum adc1_pad {
	ADC1_GPIO36 = 0,
	ADC1_GPIO37,
	ADC1_GPIO38,
	ADC1_GPIO39,
	ADC1_GPIO32,
	ADC1_GPIO33,
	ADC1_GPIO34,
	ADC1_GPIO35
};
enum adc1_atten {
	ADC1_ATTEN_0DB = 0,     /* 0 ~ 1V can be measured */
	ADC1_ATTEN_3DB,         /* 0 ~ 1.4V can be measured */
	ADC1_ATTEN_6DB,         /* 0 ~ 2V can be measured */
	ADC1_ATTEN_12DB         /* 0 ~ 4V can be measured */
};
uint32_t adc1_read(enum adc1_pad pad, enum adc1_atten att);

/*
 * Read the amp adc, IO36 as the ADC_PRE_AMP
 * make sure connecting a 270pF cap from
 * esp32_pin5 to esp32_pin6
 */
uint32_t adc1_amp_read();

inline void delay_ms(int ms)
{
	vTaskDelay(ms / portTICK_PERIOD_MS);
}

inline void delay_us(int us)
{
	ets_delay_us(us);
}

void sharp_init()
{

    /*
     * Configure the IOMUX register for GPIO 22 (some pads are
     * muxed to GPIO on reset already, but some default to other
     * functions and need to be switched to GPIO. Consult the
     * Technical Reference for a list of pads and their default
     * functions.)
    */
	gpio_pad_select_gpio(22);

	/* Set the GPIO as a push/pull output */
	gpio_set_direction(22, GPIO_MODE_OUTPUT);

	/* power off the led of partical sensor */
	gpio_set_level(22, 1);
}

int get_sharp()
{
	uint32_t dust_vo = 0;

	gpio_set_level(22, 0); // power on the LED
	delay_us(280);

	// read the dust value via ADC1 GPIO35 pin
	dust_vo = adc1_read(ADC1_GPIO35, ADC1_ATTEN_6DB) / 4096.0 * 2.0;
	delay_us(40);

	gpio_set_level(22, 1); // turn the LED off
	delay_us(9680);

	return dust_vo;
}

void read_partical_task(void *pvParameters)
{
	while (1) {
		printf("Partical value = %2.2f\n", get_sharp());
		vTaskDelay(8000 / portTICK_PERIOD_MS);
	}
}

void app_main()
{
	nvs_flash_init();
	sharp_init();

	printf("Welcome to Noduino Quantum\r\n");
	printf("Sharp GP2Y1010AU0F Particle Sensor Example... \r\n");
	xTaskCreatePinnedToCore(&read_partical_task, "read_partical_task", 1024, NULL, 5,
				NULL, 0);
}
6 Reference
- For more information please refer to


