Raspberry
(→WiFi) |
(→WiFi) |
||
| 第184行: | 第184行: | ||
</source> | </source> | ||
| − | 开机无法自动连 WiFi 则确认 /etc/network/interfaces: | + | 开机无法自动连 WiFi 则确认 /etc/network/interfaces 和 /etc/dhcpcd.conf: |
<source lang=bash> | <source lang=bash> | ||
| 第190行: | 第190行: | ||
iface wlan0 inet dhcp | iface wlan0 inet dhcp | ||
wpa-conf /etc/wpa_supplicant/wpa_supplicant.conf | wpa-conf /etc/wpa_supplicant/wpa_supplicant.conf | ||
| + | </source> | ||
| + | |||
| + | 和 /etc/dhcpcd.conf: | ||
| + | |||
| + | <source lang=bash> | ||
| + | interface wlan0 | ||
| + | static routers=192.168.1.1 255.255.255.0 | ||
| + | static domain_name_servers=192.168.1.1 | ||
</source> | </source> | ||
2020年1月20日 (一) 17:25的版本
目录 |
1 Overview
最大 TF 卡: https://elinux.org/RPi_SD_cards
http://www.waveshare.net/wiki/1.54inch_e-Paper_Module
http://www.waveshare.net/wiki/1.54inch_e-Paper_Module_(C)
2 Login
Username: pi
Password: raspberry
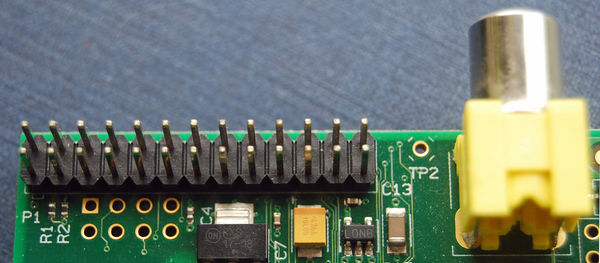
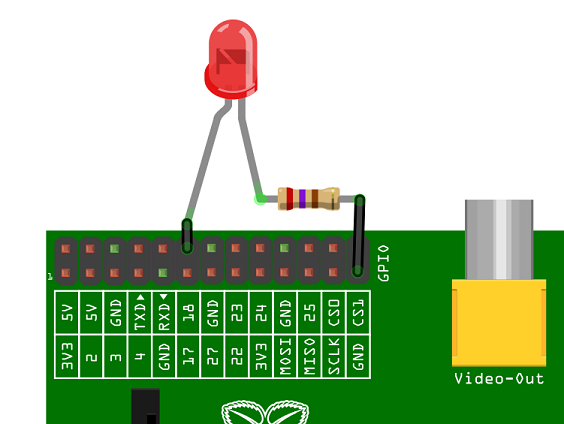
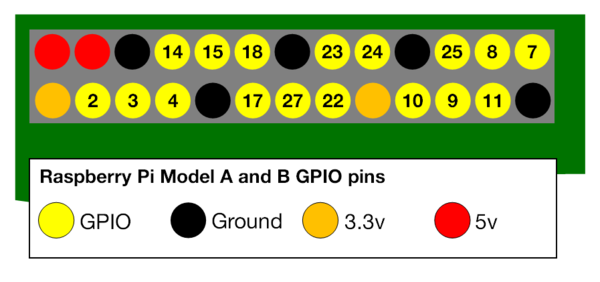
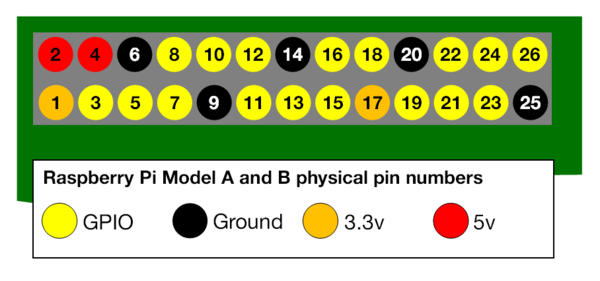
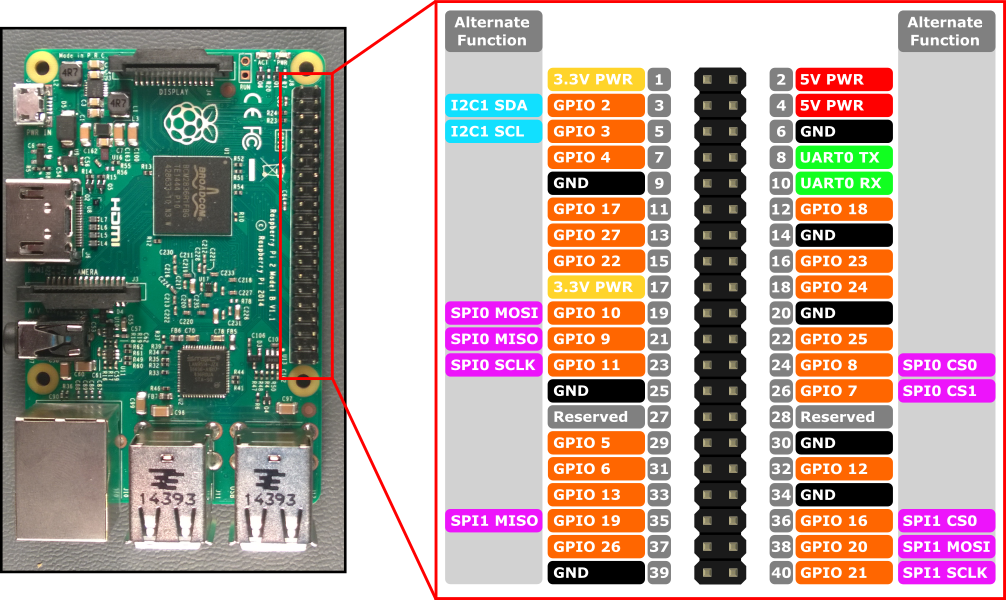
3 Pinout
3.1 Model A and B
3.2 Models A+, B+, PI 2 B, PI 3 B
4 Serial
4.1 Enable
/boot/cmdline.txt
 "console=serial0,115200"

/boot/config.txt
enable_uart=1
4.2 Disable
Remove "console=serial0,115200" from /boot/cmdline.txt
If you want to use the uart as IO device, add "enable_uart=1" into /boot/config.txt
Or you can do it by run "sudo raspi-config" , enter "Advanced Options" and then enter "Serial" ....
4.3 Connections
- RASP_TXD --- HEX_TX
- RASP_RXD --- HEX_RX
5 GPIO Control
- https://github.com/joan2937/pigpio
- raspi-gpio
- RAW: http://www.pieter-jan.com/node/15
6 Timezone
$ cat /etc/timezone
Etc/UTC
$ sudo echo "Asia/Shanghai" > /etc/timezone
add following into /etc/profile:
TZ=Asia/Shanghai
export TZ
$ sudo reboot
7 Static IP
add following into /etc/dhcpcd.conf:
interface eth0
static ip_address=192.168.1.45/24
static routers=192.168.1.1
static domain_name_servers=192.168.1.1
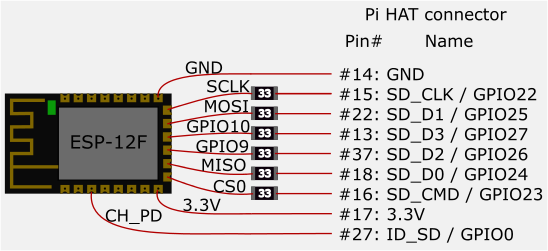
8 ESP8266/ESP8089
Note that the CH_PD signal is connected to the ID_SD signal. This must be mapped as a GPIO (GPIO0) and switched to an output and driven low then switched to an input again before the driver is loaded in order to reset the module. This will be added in the near future in the driver.
https://github.com/al177/esp8089
https://hackaday.io/project/8678/instructions?page=1
9 WiFi access-point
$ sudo apt-get install hostapd dnsmasq
10 WiFi
“Wlan0: Not associated”报错解决:
如下命令 OK,则网卡驱动 OK:
$ ifconfig wlan0
$ ifconfig wlan0 up
$ iwlist wlan0 scan | grep SSID
只需修改网络配置即可,增加一条网络凭条:
$ wpa_passphrase  YOUR_ssid YOUR_password >> /etc/wpa_supplicant/wpa_supplicant.conf

network={
        ssid="ssid"
        #psk="password"
        psk=44116ea881531996d8a23af58b376d70f196057429c258f529577a26e727ec1b
}

要使配置生效,则需要重启 wpa_supplicant:

<source lang=bash>
$ killall wpa_supplicant
$ wpa_supplicant -B -i wlan0 -c /etc/wpa_supplicant/wpa_supplicant.conf

或者:

$ sudo ifup wlan0
开机无法自动连 WiFi 则确认 /etc/network/interfaces 和 /etc/dhcpcd.conf:
allow-hotplug wlan0
iface wlan0 inet dhcp
  wpa-conf /etc/wpa_supplicant/wpa_supplicant.conf
和 /etc/dhcpcd.conf:
interface wlan0
static routers=192.168.1.1 255.255.255.0
static domain_name_servers=192.168.1.1
- https://shumeipai.nxez.com/2016/09/17/raspberry-pi-set-up-a-wireless-internet-access.html
- https://www.cnblogs.com/lfri/p/11875527.html
11 Bluetooth
 $ sudo apt-get install bluetooth bluez
 $ sudo apt-get install python-bluez
12 2G/3G/4G
$ sudo apt-get install python-gammu gammu wvdial
13 GPS
$ sudo apt-get install gpsd gpsd-clients
14 Qemu
$ sudo apt install qemu qemu-system-arm
$
- Using Qemu to custom system
- Fetch disk image from: http://www.raspberrypi.org/downloads
- Get kernel img and versatile-pb.dtb from: https://github.com/dhruvvyas90/qemu-rpi-kernel
- Run the Qemu 1st:
$ sudo apt-get install qemu
$ qemu-system-arm -cpu'?' | grep arm1176
$ qemu-system-arm -cpu arm1176 -m 256 -M versatilepb \
  -kernel ./kernel-qemu-4.14.79-stretch \
  -dtb ./versatile-pb.dtb \
  -hda ./2018-11-13-raspbian-stretch-lite.img \
  -append 'root=/dev/sda2 panic=1  init=/bin/bash' \
  -no-reboot -serial stdio
  -net nic \
  -net user,hostfwd=tcp::5022-:22 \
Edit the /etc/ld.so.preload, remove the 1st line:
#/usr/lib/arm-linux-gnueabihf/libcofi_rpi.so
QEMU 模拟器上磁盘是认作 /dev/sda , 但是实机上是 /dev/mmcblk0 所以要设定对应的符号链接,创建 /etc/udev/rules.d/90-qemu.rules 并追加以下记录:
KERNEL=="sda", SYMLINK+="mmcblk0"
KERNEL=="sda?", SYMLINK+="mmcblk0p%n"
KERNEL=="sda2", SYMLINK+="root"
Then re-run the Qemu:
$ sudo apt-get install qemu
$ qemu-system-arm -cpu'?' | grep arm1176
$ qemu-system-arm -cpu arm1176 -m 256 -M versatilepb \
  -kernel ./kernel-qemu-4.14.79-stretch \
  -dtb ./versatile-pb.dtb \
  -hda ./2018-11-13-raspbian-stretch-lite.img \
  -append 'root=/dev/sda2 panic=1' \
  -no-reboot -serial stdio
15 Image
15.1 Raspberry PI 3B
- Raspbian-4.1
- raspberrypi-jessie-WAZIUP-demo.dmg.zip
- 2019-04-08-raspbian-stretch-lite.zip
15.2 Raspberry Model A/B
- raspberrypi-jessie-WAZIUP-demo.dmg.zip (HomeAssist)
15.3 Notes
- Write image into SD card
$ sudo dd bs=1m if=2019-04-08-raspbian-stretch-lite.img of=/dev/rdisk2 conv=sync
- Make SD card into a img file
$ dd if=/dev/mmc0 | gzip -9 > sd-all.img.gz
$ gzip -dc /tmp/sd-all.img.gz | sudo dd of=/dev/mmc0
- Mount the img
sudo apt-get install dosfstools dump parted kpartx
sudo losetup /dev/loop0 2019-04-08-raspbian-stretch-lite.img
mkdir -p /mnt/a/boot/
mkdir -p /mnt/a/root/
sudo kpartx -av /dev/loop0
boot="/dev/mapper/loop0p6"
root="/dev/mapper/loop0p7"
sudo mount $boot /mnt/a/boot/
sudo mount $root /mnt/a/root/

sudo kpartx -d /dev/loop0
sudo losetup -d /dev/loop0
15.4 Backup the System into img
#!/bin/sh
sudo apt-get install -y dosfstools parted kpartx rsync

df=`df -P | grep /dev/root | awk '{print $3}'`
dr=`df -P | grep /dev/mmcblk0p1 | awk '{print $2}'`
df=`echo $df $dr |awk '{print int(($1+$2)*1.2)}'`

sudo dd if=/dev/zero of=raspberrypi.img bs=1K count=$df

sudo parted raspberrypi.img --script -- mklabel msdos

start=`sudo fdisk -l /dev/mmcblk0| awk 'NR==10 {print $2}'`
start=`echo $start's'`
end=`sudo fdisk -l /dev/mmcblk0| awk 'NR==10 {print $3}'`
end2=$[end+1]
end=`echo $end's'`
end2=`echo $end2's'`

sudo parted raspberrypi.img --script -- mkpart primary fat32 $start $end
sudo parted raspberrypi.img --script -- mkpart primary ext4 $end2 -1

loopdevice=`sudo losetup -f --show raspberrypi.img`
device=`sudo kpartx -va $loopdevice | sed -E 's/.*(loop[0-9])p.*/\1/g' | head -1`
device="/dev/mapper/${device}"
partBoot="${device}p1"
partRoot="${device}p2"
sudo mkfs.vfat $partBoot
sudo mkfs.ext4 $partRoot
sudo mount -t vfat $partBoot /media
sudo cp -rfp /boot/* /media/
sudo umount /media
sudo mount -t ext4 $partRoot /media/
cd /media
sudo rsync -aP --exclude="raspberrypi.img" --exclude=/media/* --exclude=/sys/* --exclude=/proc/*  --exclude=/tmp/* / ./

# replace PARTUUID
opartuuidb=`blkid -o export /dev/mmcblk0p1 | grep PARTUUID`
opartuuidr=`blkid -o export /dev/mmcblk0p2 | grep PARTUUID`
npartuuidb=`blkid -o export ${device}p1 | grep PARTUUID`
npartuuidr=`blkid -o export ${device}p2 | grep PARTUUID`
echo "BOOT uuid old=$opartuuidb -> new=$npartuuidb"
echo "ROOT uuid old=$opartuuidr -> new=$npartuuidr"
sudo sed -i "s/$opartuuidr/$npartuuidr/g" $dst_boot_path/cmdline.txt
sudo sed -i "s/$opartuuidb/$npartuuidb/g" $dst_root_path/etc/fstab
sudo sed -i "s/$opartuuidr/$npartuuidr/g" $dst_root_path/etc/fstab

cd
sudo umount /media
sudo kpartx -d $loopdevice
sudo losetup -d $loopdevice
16 config.txt
- https://www.raspberrypi.org/documentation/configuration/config-txt/README.md
- https://www.raspberrypi.org/documentation/configuration/config-txt/video.md
17 Offical 7' touchscreen
18 Preempt-RT
- Raspberry Pi Going Realtime with RT Preempt
- RT-PREEMPT realtime kernel (Raspberry Pi)
- CONFIG_PREEMPT_RT on Raspberry Pi
19 Reference
